

bean there, haven't done that
I don't know about you but I measure my day in cups of coffee I've had. I wake up and almost immediately brew a full pot. As soon as I get to the office, I have another. By the end of the day I've had at least 4, and on a bad day (or maybe a good day? Still haven't decided.) I've had 5+.
So, I'll be the first to admit it. I have a caffeine addiction I think most of us do-- more specifically a coffee addiction. I can't help it! Since elementary school, my parents would take us through the drive-thru of out closest Starbucks and the scent would pour into the car like a cup being filled. The smell lingered for hours and from then on I knew that I wanted to be a barista. I was so obsessed with Starbucks that I would make mix CD's with titles like "Starbucks Music" "Starbucks Tunes" AND I wanted to desperately to redecorate my room like a Starbucks. During college, it finally happened. I became a Starbucks barista and one of my childhood dreams became true. I worked there for 2 years, and it was honestly the most fun I've ever had at a job. I still see people and remember their order (and It's been over 4 years since I left).

During my time at Starbucks I fell deeper in love with coffee. I learned as much as I could about it, and even hosted monthly coffee trainings. Did you know that, according to legend, a goat herd in Ethiopia circa 800 AD? The shepherd noticed how energetic his goats were after munchin' on these little tiny red berries and he, like any normal 9th century shepherd decided to eat them as well. From then, coffee started its journey through Arabia (hence Arabica beans) to what we know and love today.
Enough history -- through my years of coffee experience (and a little inspiration from my Hispanic heritage) I have found the perfect coffee recipe, every time. I definitely recommend grinding your own coffee beans at home (which means buying whole bean instead of pre-ground). Coffee, like wine, has so many different flavor profiles all dependent on where the bean was grown, what the soil conditions were like, when the beans were harvested, and how long they were roasted for. Typically I like beans grown in Guatemala (floral, summery, aromatic) or Columbia (mellow, caramel, ripe). I suggest buying coffee for the week, so every Sunday I'm buying a new pound of coffee. Keep it in an air tight container (that means removing it from the bag, a lesson I learned the hard way).

honestly, don't even know where I found this graph but it's great and I've had it for years.
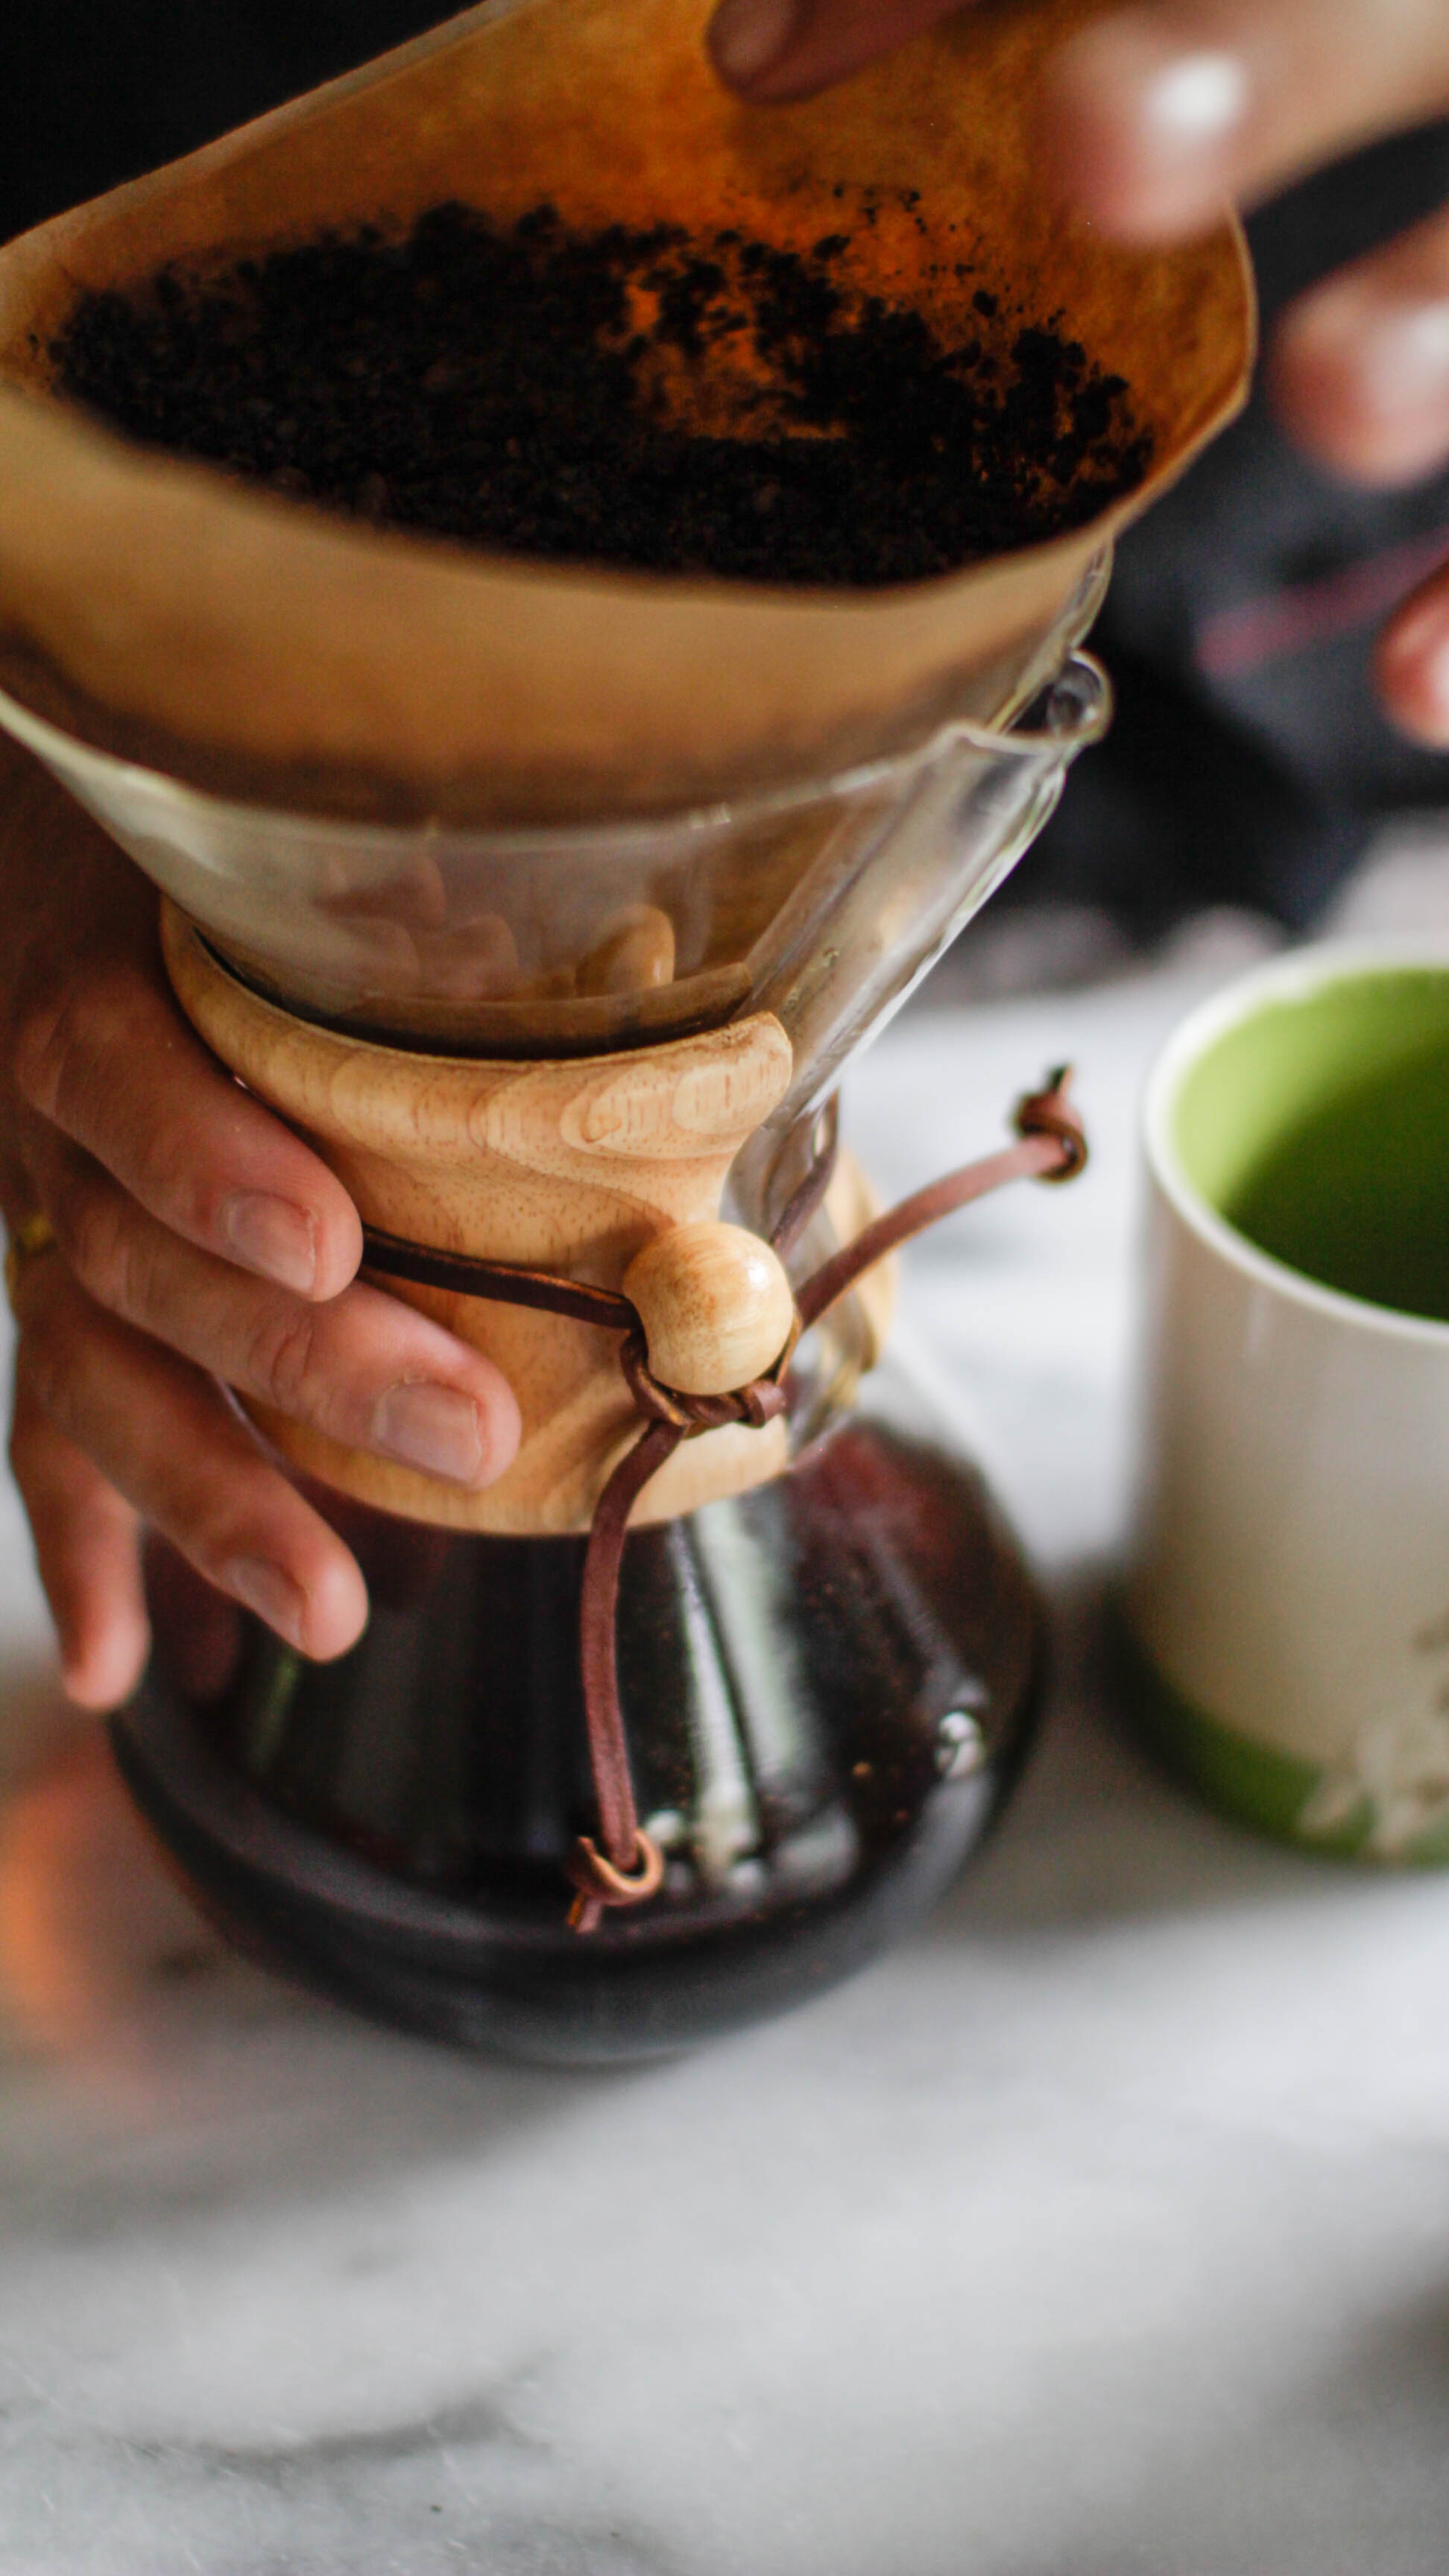
Once you have your beans, if using a traditional coffee maker I suggest 2 tablespoons of ground coffee to ever 6 ounces of water. If you like it stronger, just add more grounds to the maker! If you prefer weaker coffee, add less! Did you know that light roasted coffee actually has more caffeine than dark? The roasting process actually burns caffeine out of the bean, so the longer it sits the less potent the coffee. When I make coffee in my Chemex, or a french press, I typically add an extra half tablespoon of grounds. NOW, for my secret. Before I start the coffee maker, or pour the hot water over my grounds (in the Chemex) I add cinnamon. To the grounds. You read that correctly. It just adds a really nice warmth to the coffee, and cinnamon boosts your metabolism!! Especially with South American and Ethiopian coffees, it really kicks up the flavor. Reminiscent of café de olla a Mexican spiced coffee it always takes me back to childhood. Smelling coffee brewing in the kitchen, then later in life smelling it through the Starbucks drive thru, and even later, brewing it on my own. Who doesn't want that!? Once your coffee is brewed, add to it whatever you'd like (duh). If you like foamy milk, heat so milk up in a saucepan and whisk away until it's nice and frothy! The possibilities are endless.
Cold brew is just as simple, but the wait time is longer. Worth it? Definitely. It's smoother and honestly a bit sweeter than traditional hot coffee, no matter the country of origin. To make your own cold brew, use the 1:8 ratio! So, about 2 cups of water to 4.5 tablespoons of coffee. Stronger than hot coffee for SURE. Coarsely grind your beans, and add them to the bottom of a sealable container, add the water, seal and let the beans steep in the water for at least 18 hours but no longer than 24. Then strain and you're all set! It's really that simple.

Coffee is something that we all drink (if you don't I will never understand), but it's also something that's a giant part of the human experience! Dating back to the 9th century, one of the oldest beverages on the planet and we still find new ways to enjoy it. How do you take your coffee? ALSO! DISCOUNT CODE ALERT! Use code: MSP for 12% off amazing single origin Guatemalan via Aktion Specialty Coffee!
Toast to Toast
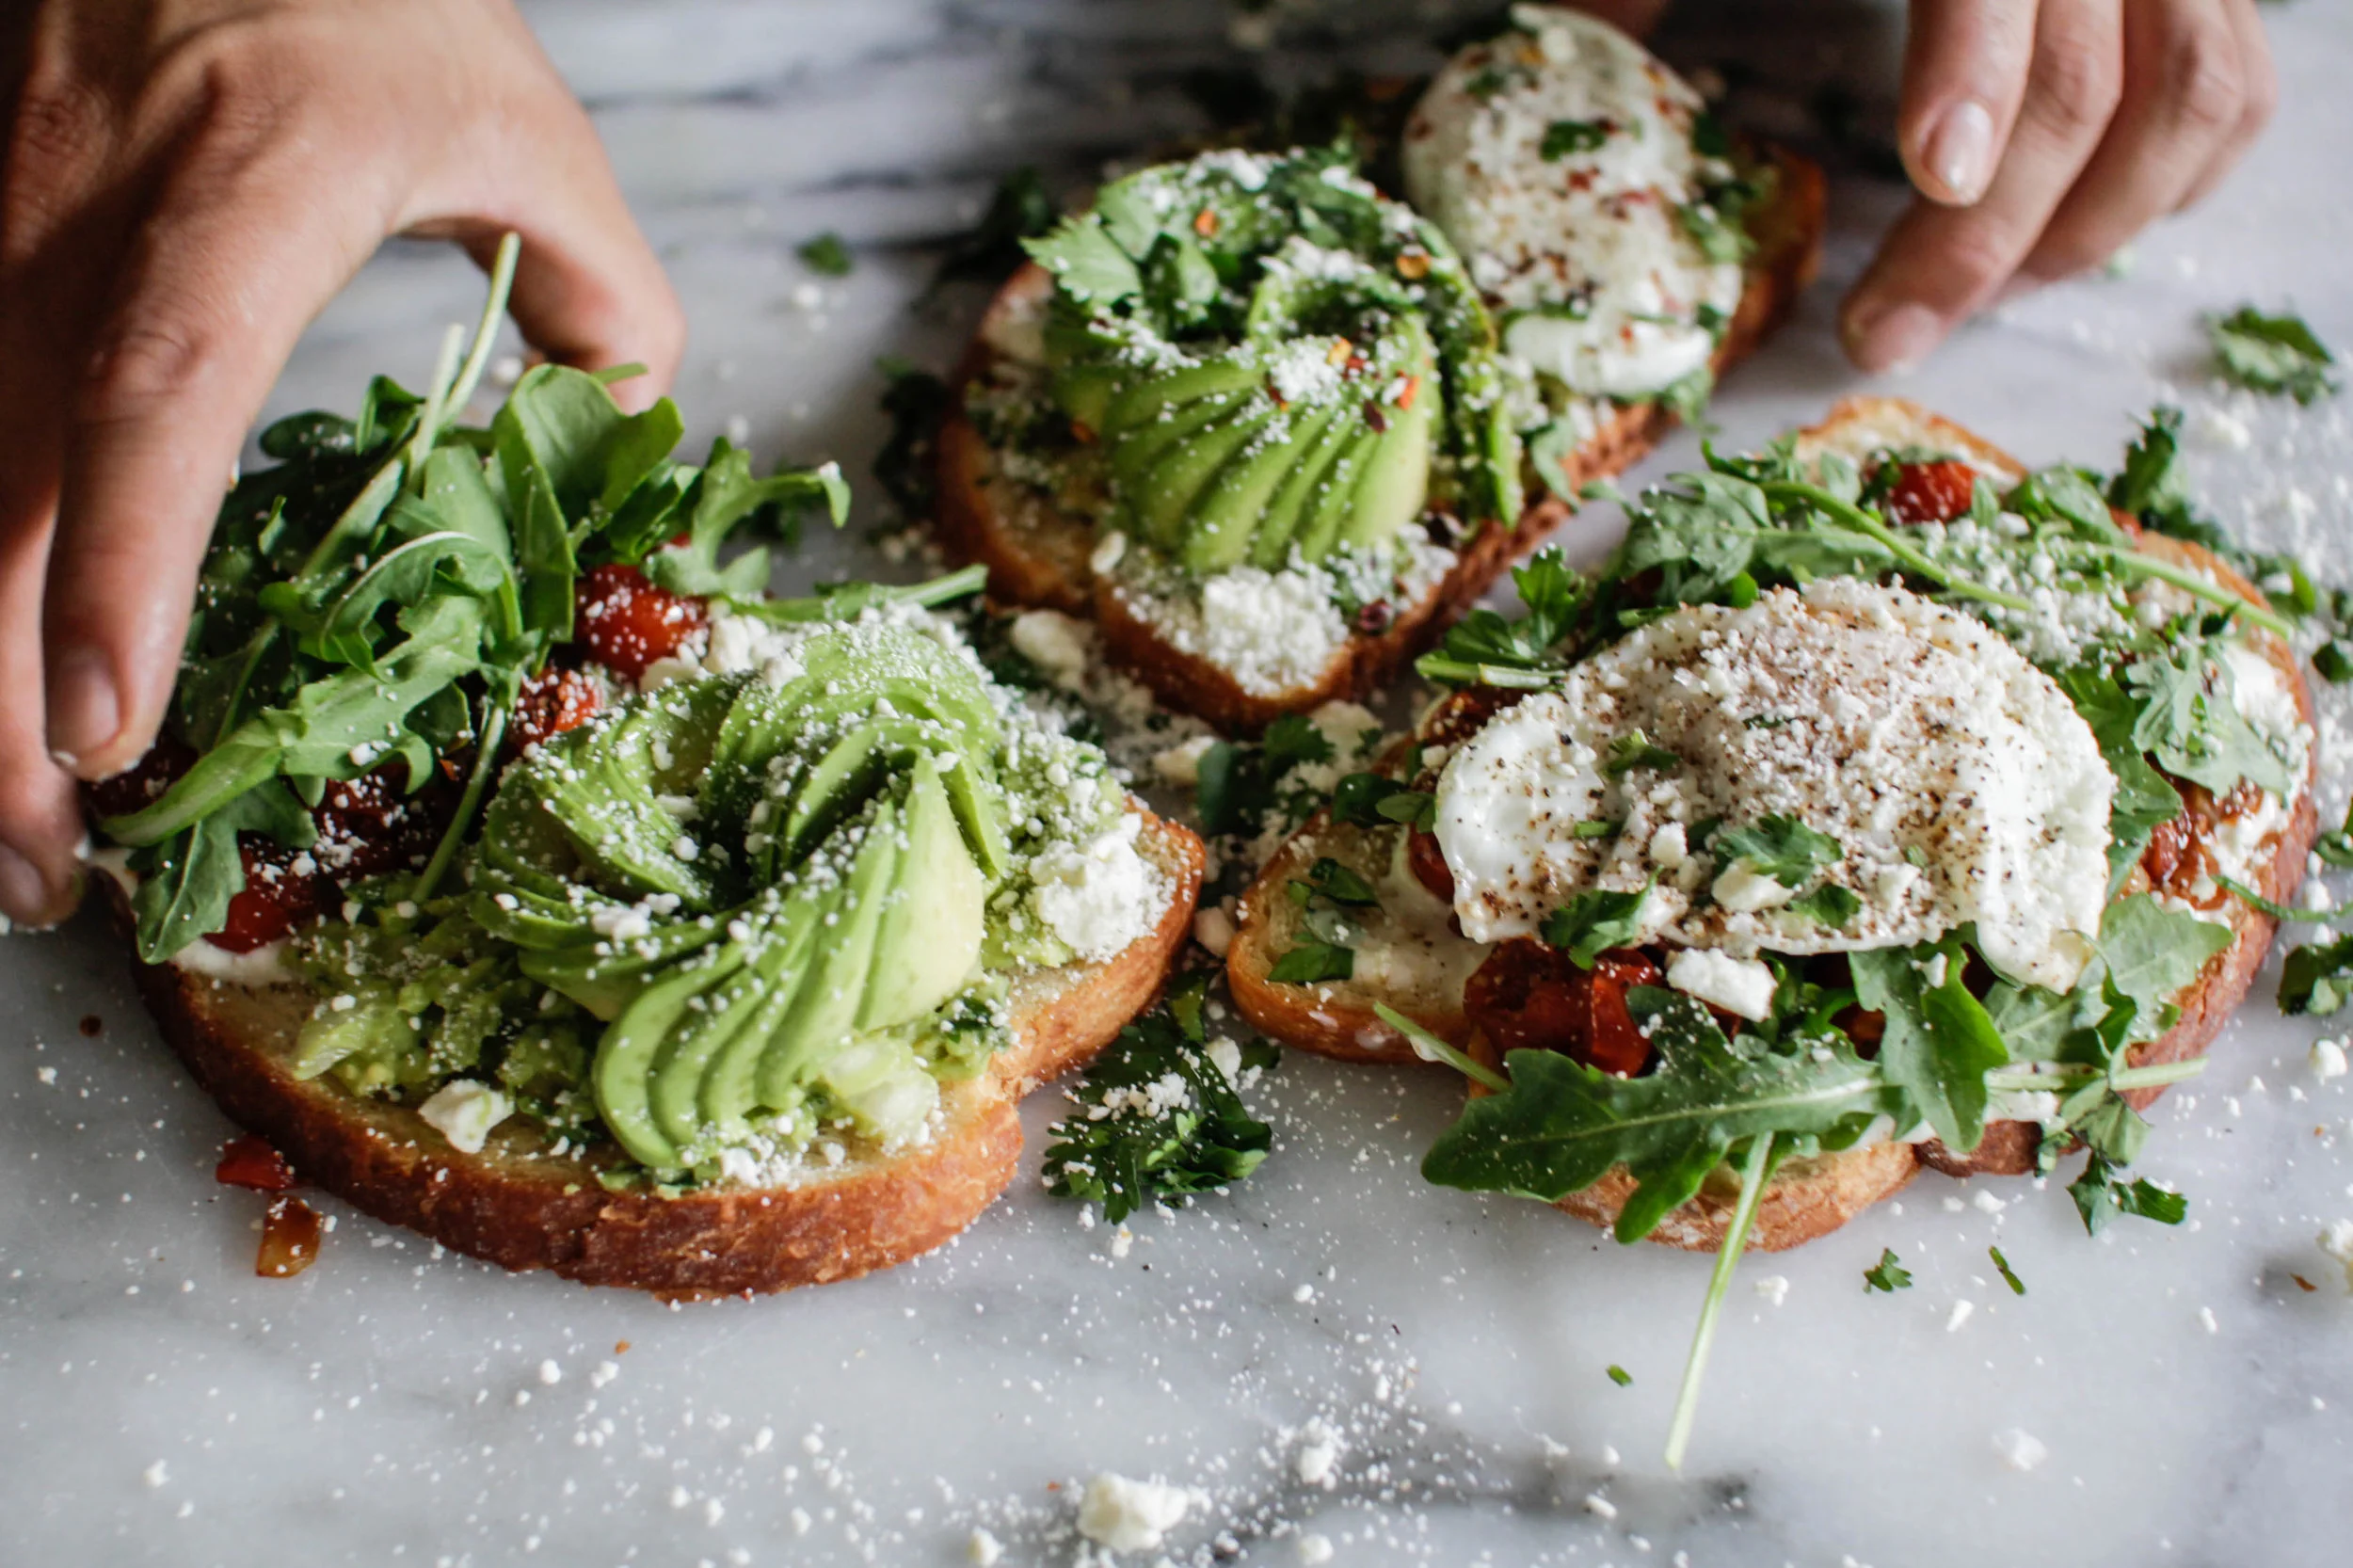
Guess what -- I have another toast recipe. I know, I know-- a millennial with more toast, what's new? BUT this isn't avocado toast. It's TOMATO TOAST.

Since my weekend is Sunday and Monday, I decided to make a Monday fun again, and host some friends over for a "Monday Funday" brunch, if you will. I LOVE a good brunch (almost as much as I love a comma splice), and if you've been following along then you've noticed that most of my recipes are perfect for that time of day when it's not really breakfast and not really lunch, but definitely time to eat. I had all the ingredients for a good brunch -- OJ, bubbly wine, potatoes and toast. You know avocado toast is my go-to for last minute brunch parties (and I obviously made it) but I wanted to switch it up and add something new to the menu! Isn't that how life goes though? Just as you get really good at something, you just as quickly get bored and need other stimulus...I digress. I had some cherry tomatoes in my fridge from the farmer's market and some basil growing in the garden so I whipped up a tomato jam. It's definitely a lot easier than it sounds! Together with a lemon aioli, and some fresh arugula it's the perfect compliment for a poached egg.
Here's what you need:
- 2 cups of halved cherry tomatoes
- 1/2 of a small white onion, diced
- 4 or 5 fresh basil leaves
- 5 tablespoons balsamic vinegar
- 1 tablespoon sugar
- 1 cup fresh arugula
- 2 poached egg
- two slices of toast
- 1 cup mayo (or greek yogurt)
- juice of 1 lemon
- a sprinkle of cayenne pepper
- feta cheese
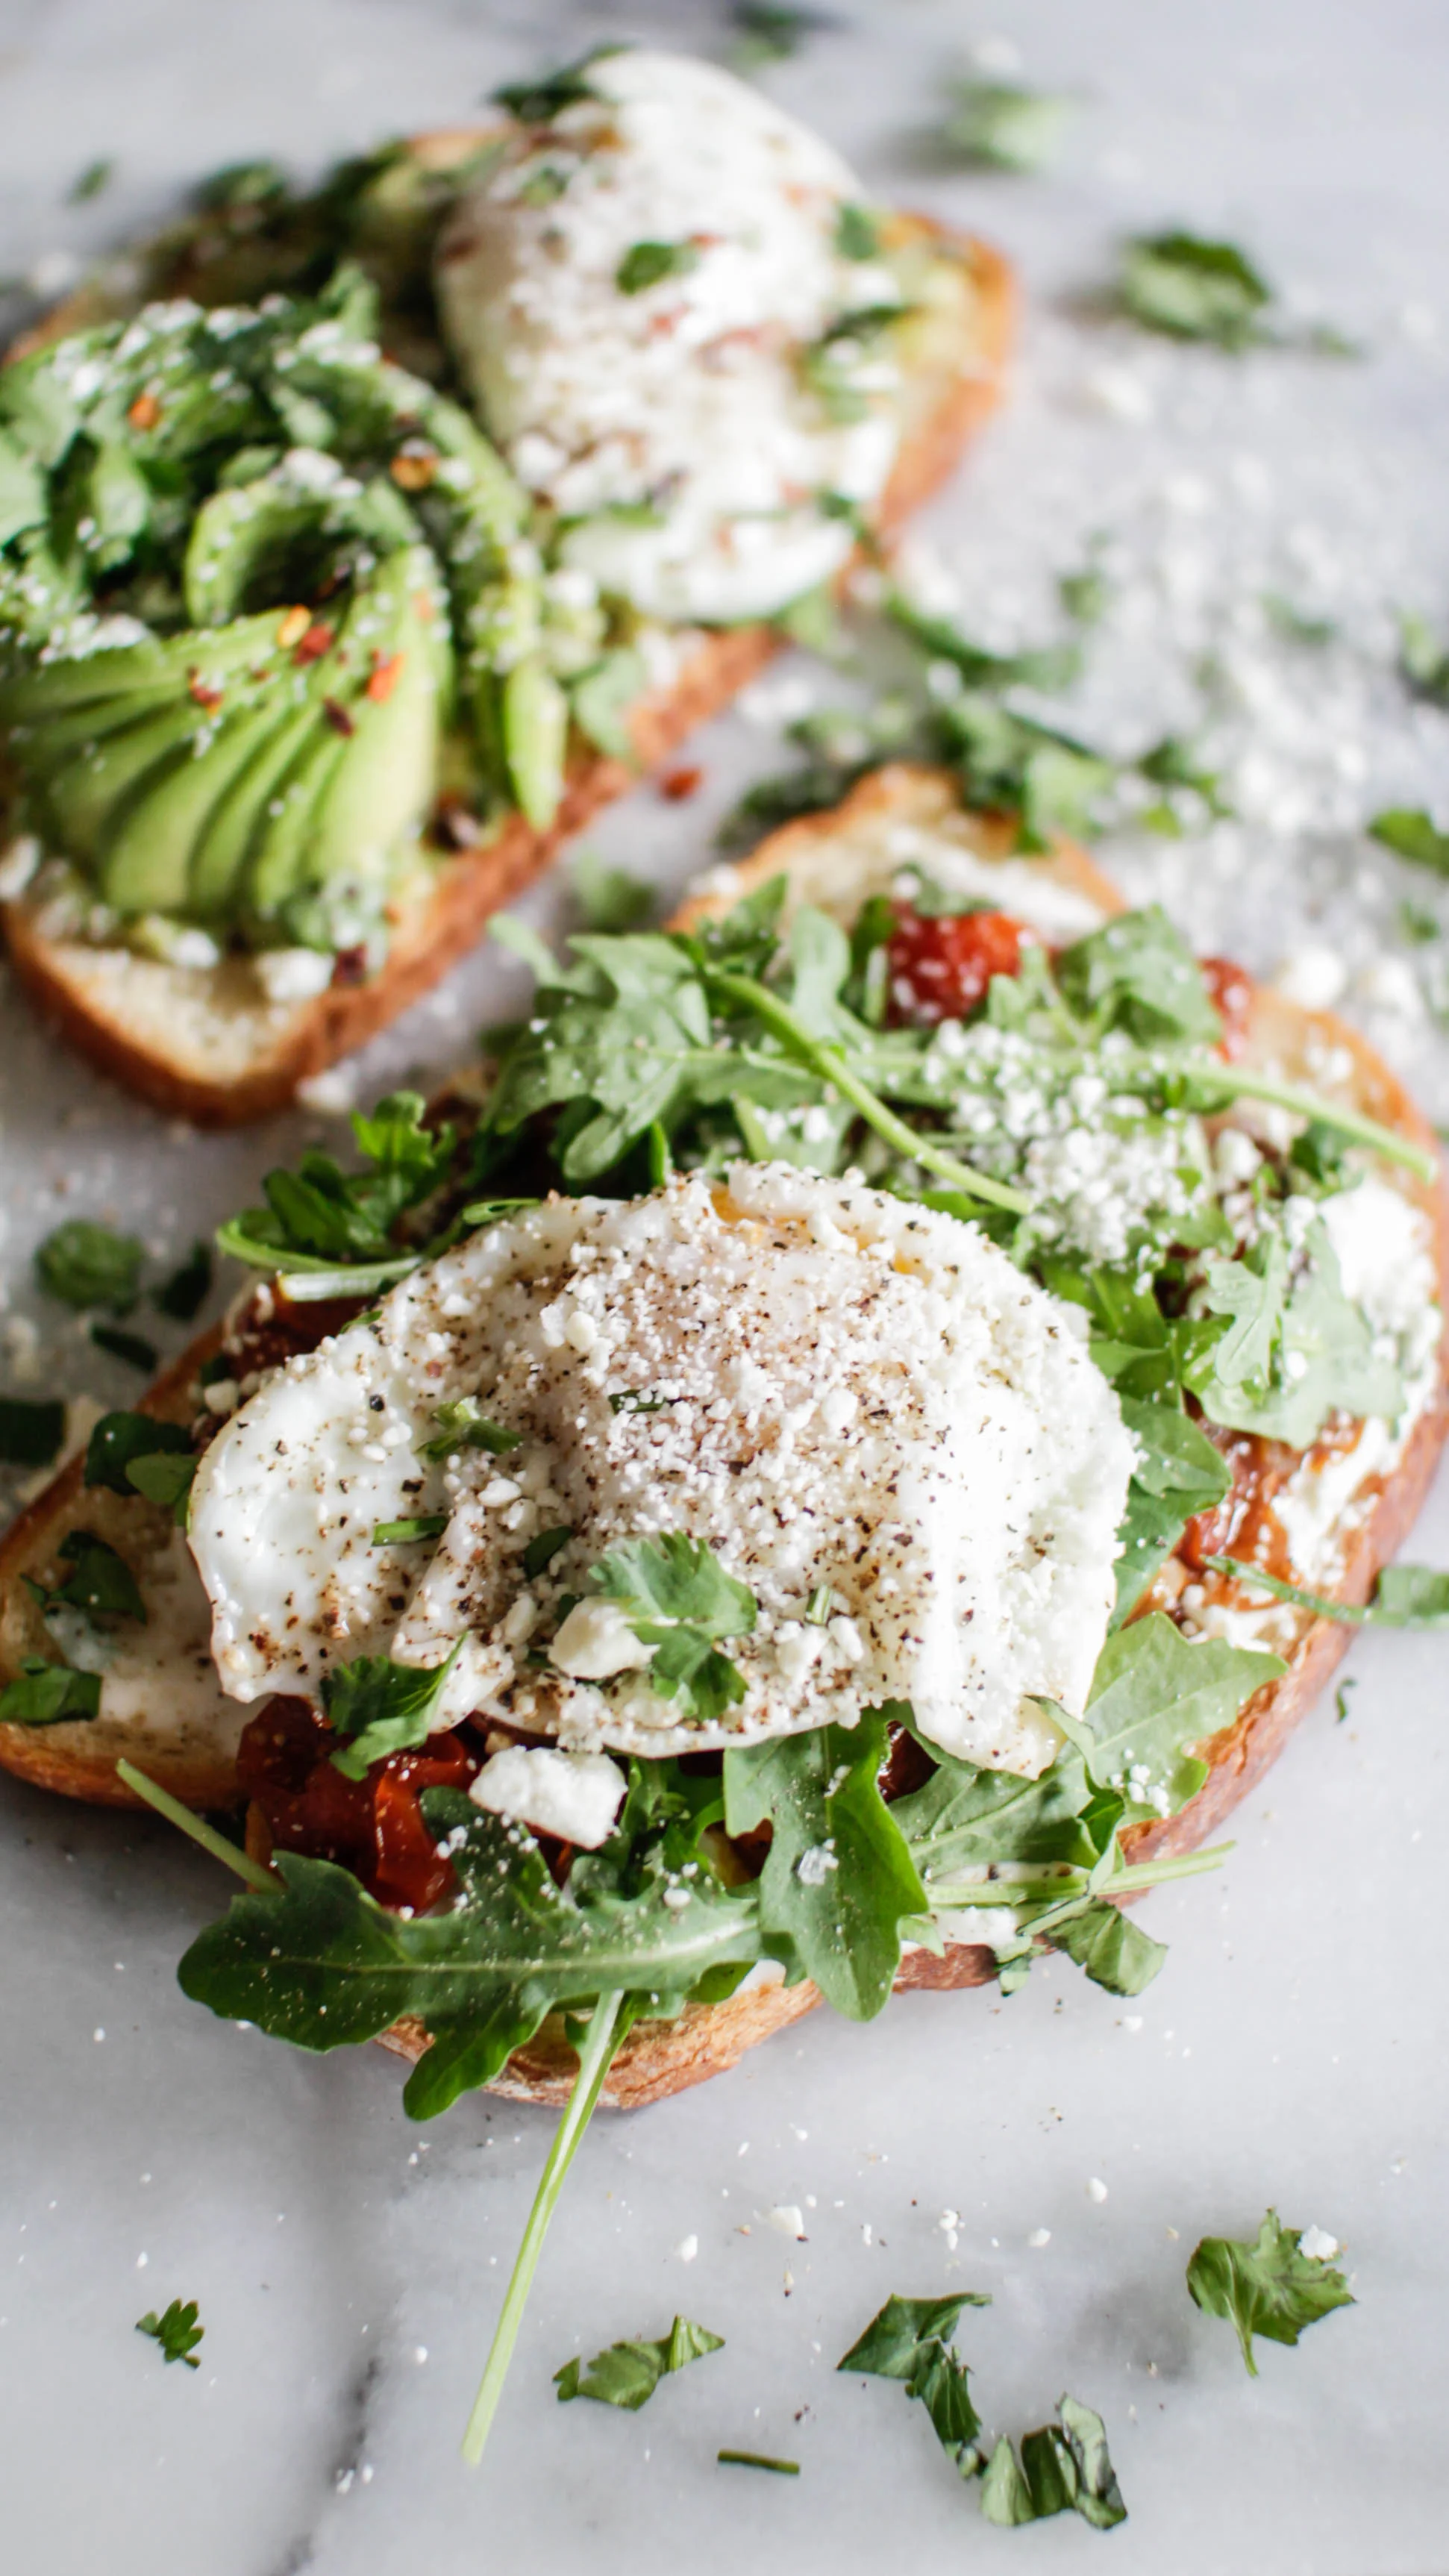
In a medium sauce pan over medium high heat, warm about a tablespoon of EVOO, add the diced onions and let them come to a translucent sweaty state (often how I feel after a workout). The onions should have a nice golden color, and smell sweet. Add the tomatoes, balsamic vinegar, hand ripped basil leaves, and sugar. Let the tomatoes come to a boil, reduce the heat to low and simmer for about 30 minutes. The jam should come together so nicely, and the sweet acidity of the tomatoes plays so well against the peppery arugula and rich egg yolk.
For the aioli, combine 1 cup of mayo (or greek yogurt), the juice of one lemon and a sprinkle of cayenne until you get a ranch dressing like consistency. Super easy!
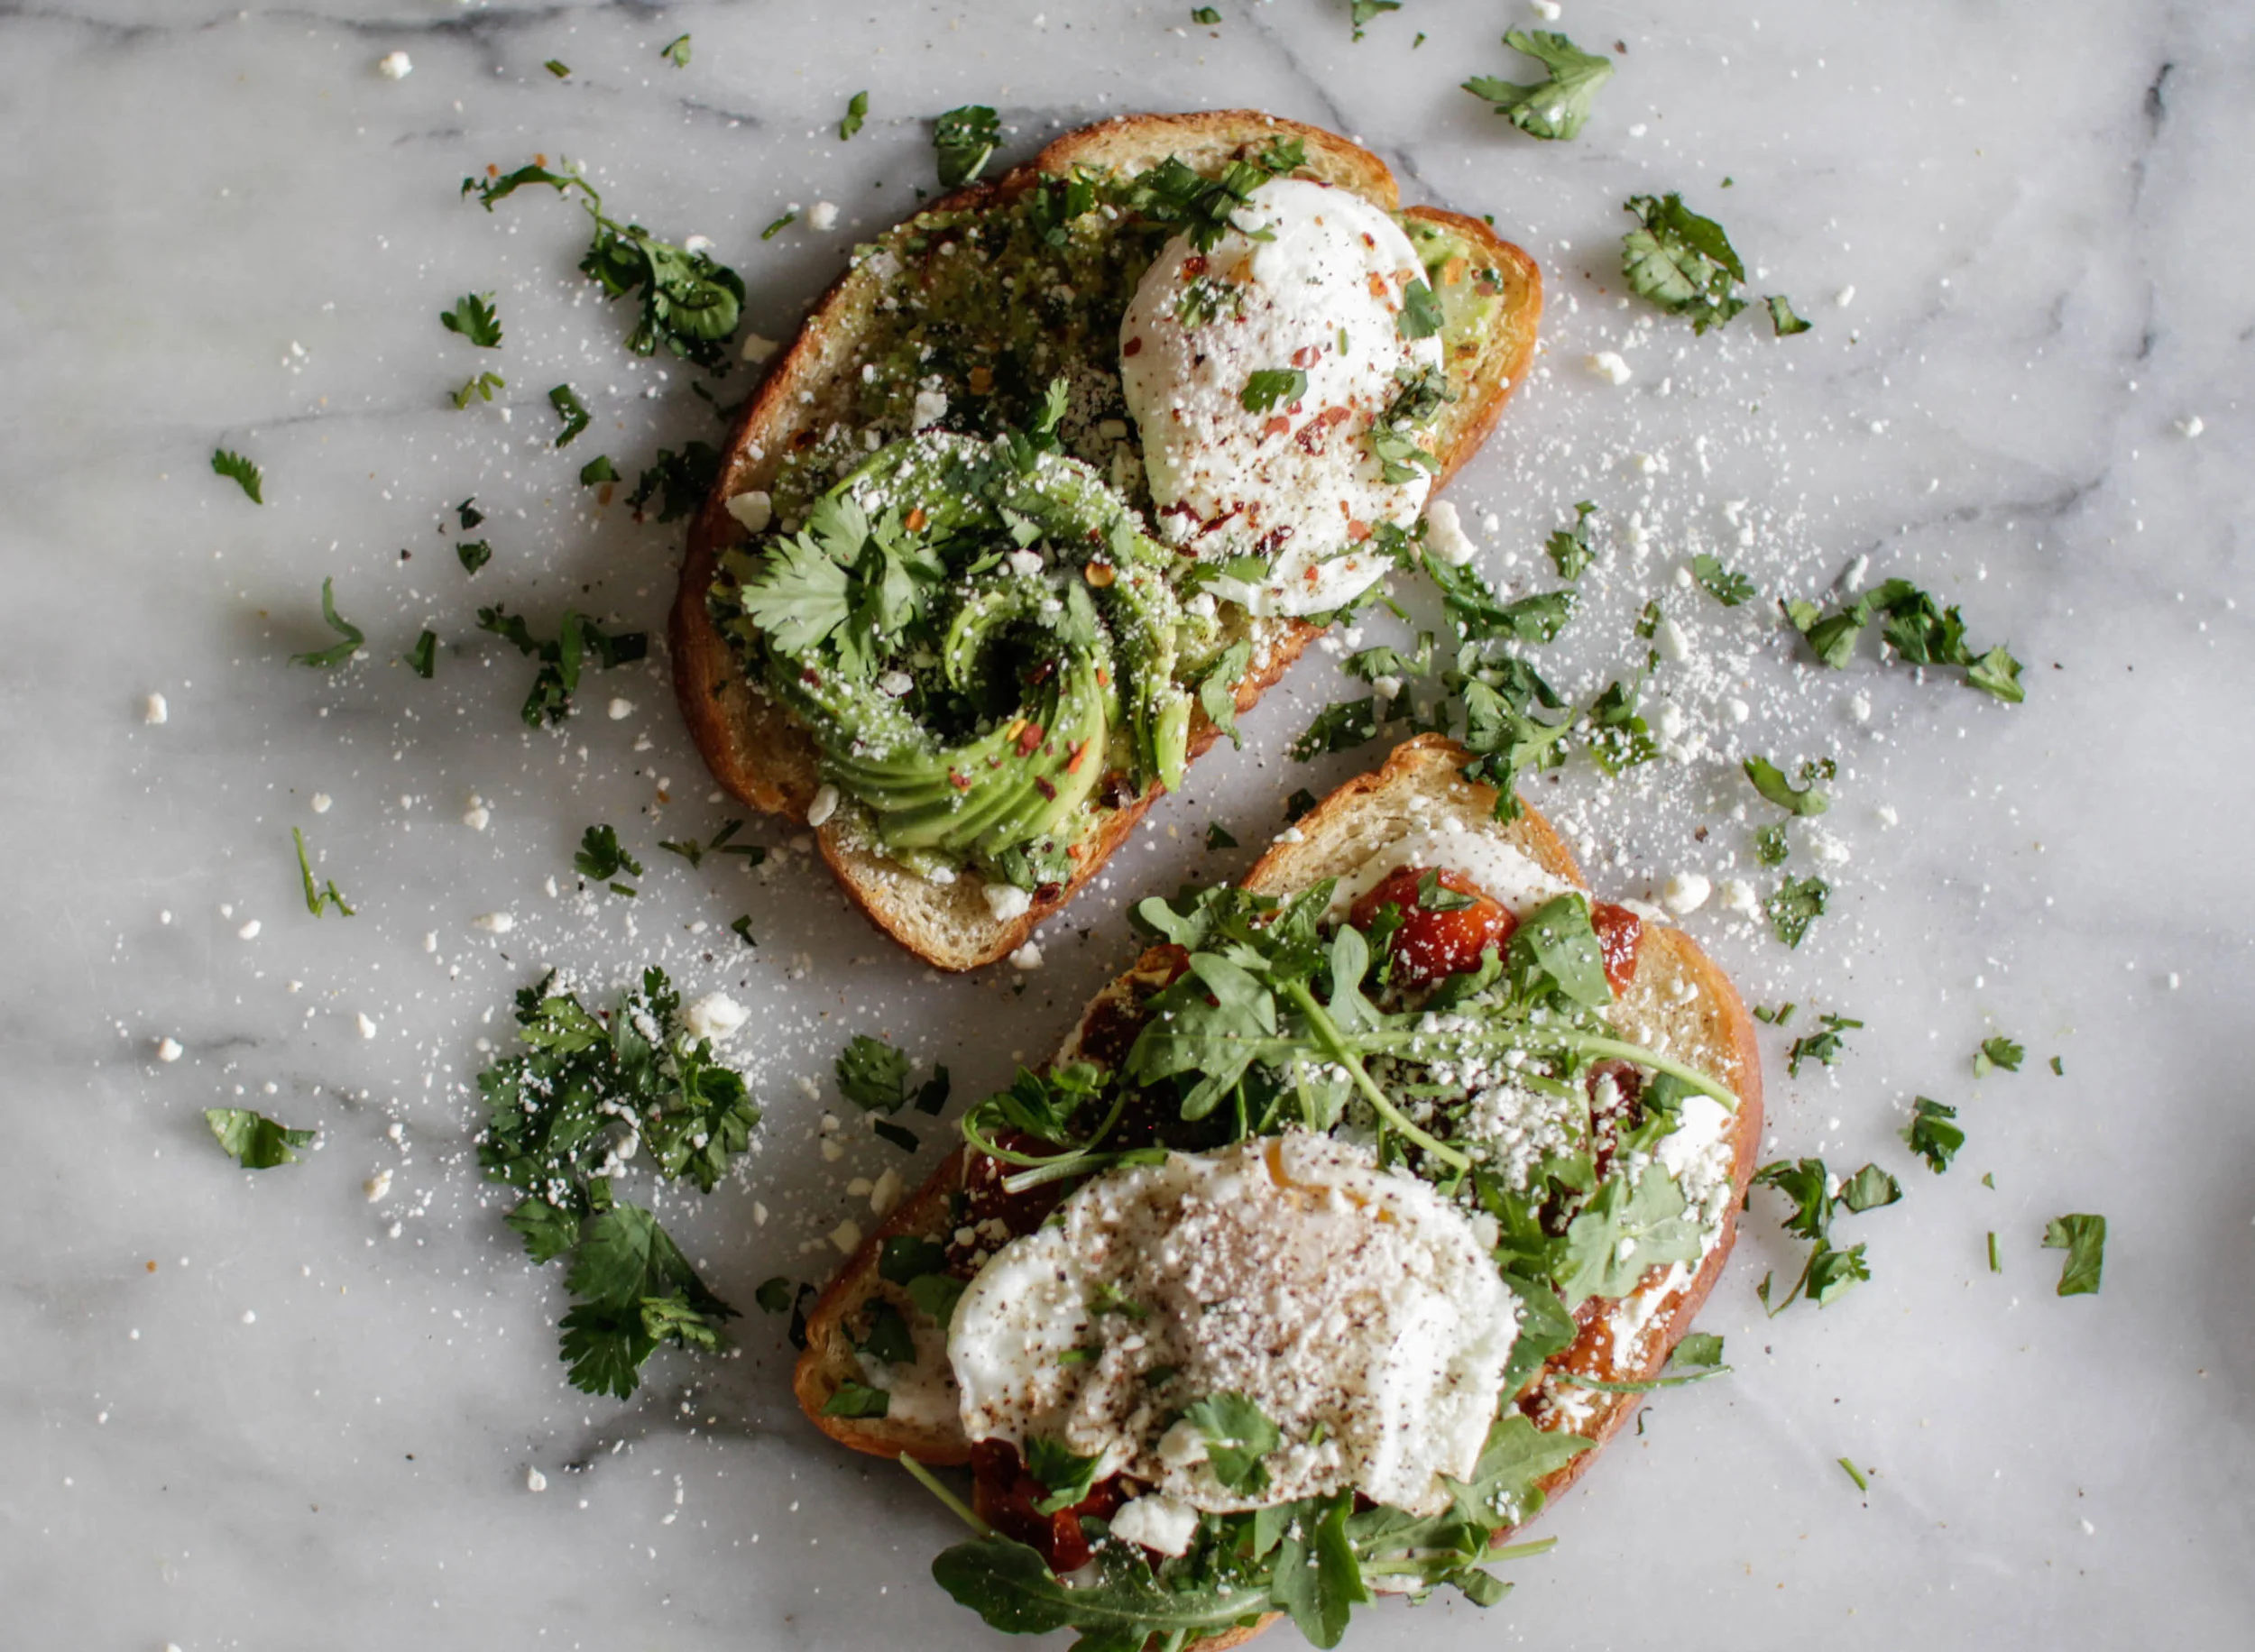
Once your egg is poached, fried, or even scrambled and your bread is toasted (I toast in the oven for 10 minutes at 350 drizzled with olive oil), it's assembly time. Spread the aioli on your toast, add the tomato jam, top with arugula and an egg. In the words of Ina Garten, "how easy is that"? What are your go-to brunch recipes?

photos by Macaila Britton

I'm soy into you, I can barely breathe.
soy + salmon + avocado + grapefruit + arugula
Guys. Team. Friends. I have NOT been eating as well as I want to recently. Some changes at work have kind of shaken me up, so I've been on the go more than I thought I would be. Between commuting, working out, and trying to be social I've been eating out way more than I need to. Honestly, how can you resist the sweet sweet smell of Panda Express, or the Golden Arches?!

After a day of shopping on Sunday, I was seriously craving sushi. Did you know that 2 rolls is the equivalent to eating a LOAF of bread?! All those carbs?! With a Miami trip next week I'm trying to eat as little carbs as possible (I literally hear one of my trainers saying "CARBS ARE GOOD" as I write that) so I decided to make deconstructed salmon sushi. It was actually so so easy, so quick, and so healthy! Salmon is high in omega-3 fatty acids, vitamin B, and potassium. Avocados are packed with potassium, have so much fiber and have been linked to lower cholesterol levels. Grapefruit boosts your immune system and metabolism (citrus, duuuuh), and the scent alone is a major stress reliever.

Here's what you need for a serving of 4:
- 4 small avocados
- 1 large grapefruit
- 2 cups of arugula
- 4 fresh salmon filets
- salt + pepper
- finishing salt
- 4 tablespoons of soy sauce
Start by getting a pan (I always use cast iron) RIPPING hot. Like, to the point where you think "hmmm, maybe it shouldn't be this hot" and then a little hotter. While the pan is getting hot, season the salmon with salt and pepper on both sides, liberally. When the skillet is hot, add 2 tablespoons of oil and add the salmon skin side down. Immediately add two tablespoons of soy sauce and resist the urge to touch the fish with your spatula. The skin will stick at first, but release from the pan when it's ready, like searing a steak. After about 4 minutes, it should move easily from the pan, and sear it on the other side for about 6 minutes, lowering the heat to medium. Add the rest of the soy sauce. The salmon should have a nice crispy skin, and a beautiful sear. Once the salmon is cooked on both sides, remove it from the heat and cover it with foil. While I dice the avocado and grapefruit, I let the salmon rest.
Dicing an avocado is fairly simple. There are hundreds of how-to videos on the internet. The grapefruit, however, almost got me. They're SO HARD TO PEEL, LIKE WHY???? I'll admit, dicing a grapefruit wasn't the easiest. You have to peel it, then section it, and then cut those into smaller pieces. Once the avocados and grapefruit are about the same size, put them in a bowl with a drizzle of olive oil, season with salt and toss together! In a separate bowl, toss the arugula with some olive oil and some S&P.
ASSEMBLY TIME.
On your plate, pile the avocado and grapefruit salad, top with the salmon, and top with the arugula. Finish with some finishing salt #saltbae style, and enjoy!


keen on quinoa
chicken + sweet potato + shredded kale + quinoa + almonds = heaven? sounds about right.
Hey team! Don't know why I just called you all team, but I like it so we're going with it. How are you? If you're anything like me then you've been on a fitness journey that's lasted way longer than you expected, taken way too many turns, and has left you craving all the food.
The other day I had just gotten home from taking a boxing class (if you live anywhere in Chicagoland, you NEED to come check out Midwest Strength + Performance) where I had literally been handed my butt on a silver platter. I was tired, sweaty, but most of all HUNGRY. In the spirit of *health & wellness* I made a chicken & quinoa bowl. Trust me, it's much better than it sounds.
Here's what you need:
- 1 cup quinoa
- 2 cups water (or any stock, if you like more flavor) TRUST ME, GO WITH THE STOCK
- 1 chicken breast (you can get these already cooked at Whole Foods, or just use a rotisserie)
- 1 sweet potato
- 1 yellow squash
- 2 cups shredded kale (seems like a lot, but it cooks down so much)
- 1/4 cup slivered almonds
- 1 teaspoon cayenne pepper
- 1 tablespoon sesame seeds
- salt & pepper
Ok, so quinoa sounds a lot harder to make than it is. I've heard that you have to rinse it, like rice, before cooking it, that it needs to be covered while cooked, that you should triple the amount of water blah blah blah. It's actually SO easy. Ready? Put one part quinoa in a pot, then add 2 parts water (or stock) and then let it simmer until all the liquid is absorbed. SO EASY. It really only takes about 20 minutes. I try my best to just let it do it's thing, but sometimes you can't resist and have to give it a little stir. As soon as the liquid is absorbed, I take it off the heat and fluff with a fork. Then just season it with some salt and pepper, and you're set! 1 cup of quinoa is actually so much, so I like to make large amounts at the beginning of the week and then slowly use it. It's my tiny step into the world of meal prepping. For this recipe we'll use the whole cup.
If you're making this recipe from start to finish, while the quinoa is cooking it's the perfect time to peel and dice the sweet potato, yellow squash, and shred the kale. Once they're all done, add the cooked quinoa, veggies, and cayenne pepper to a oiled skillet on medium heat and cover-- cook until the sweet potatoes are fork tender, so about 15 minutes, checking constantly so the quinoa doesn't over cook. There should be a nice quinoa socarrat at the bottom of the skillet. While the quinoa and veggies are getting married in the skillet, I cook chicken breast in a separate skillet with salt, pepper, and a dash of cayenne. The timing should be about perfect! Once it's done, slice it and it's ready for the bowl!

Once the veggies are cooked down, take it off the heat, top chicken breast (or without for vegan and veggie friends) and enjoy! I top it with almond slivers, sesame seeds and of course a little Sriracha. If you don't have time (or honestly just don't want to) use a rotisserie chicken! So much easier.
This has quickly become one of my favorite recipes to make-- if you make a giant batch on Monday, it will keep through the week and you can eat it hot, warm, and cold. At every temp different flavor profiles will come through! It's SO healthy since ,"quinoa is gluten-free, high in protein and one of the few plant foods that contain all nine essential amino acids. It is also high in fiber, magnesium, B-vitamins, iron, potassium, calcium, phosphorus,vitamin E and various beneficial antioxidants" and who doesn't love chicken and spice.
Next time you get home from a workout and have no idea what to make, try this, or incorporate it into your weekly meal prep!

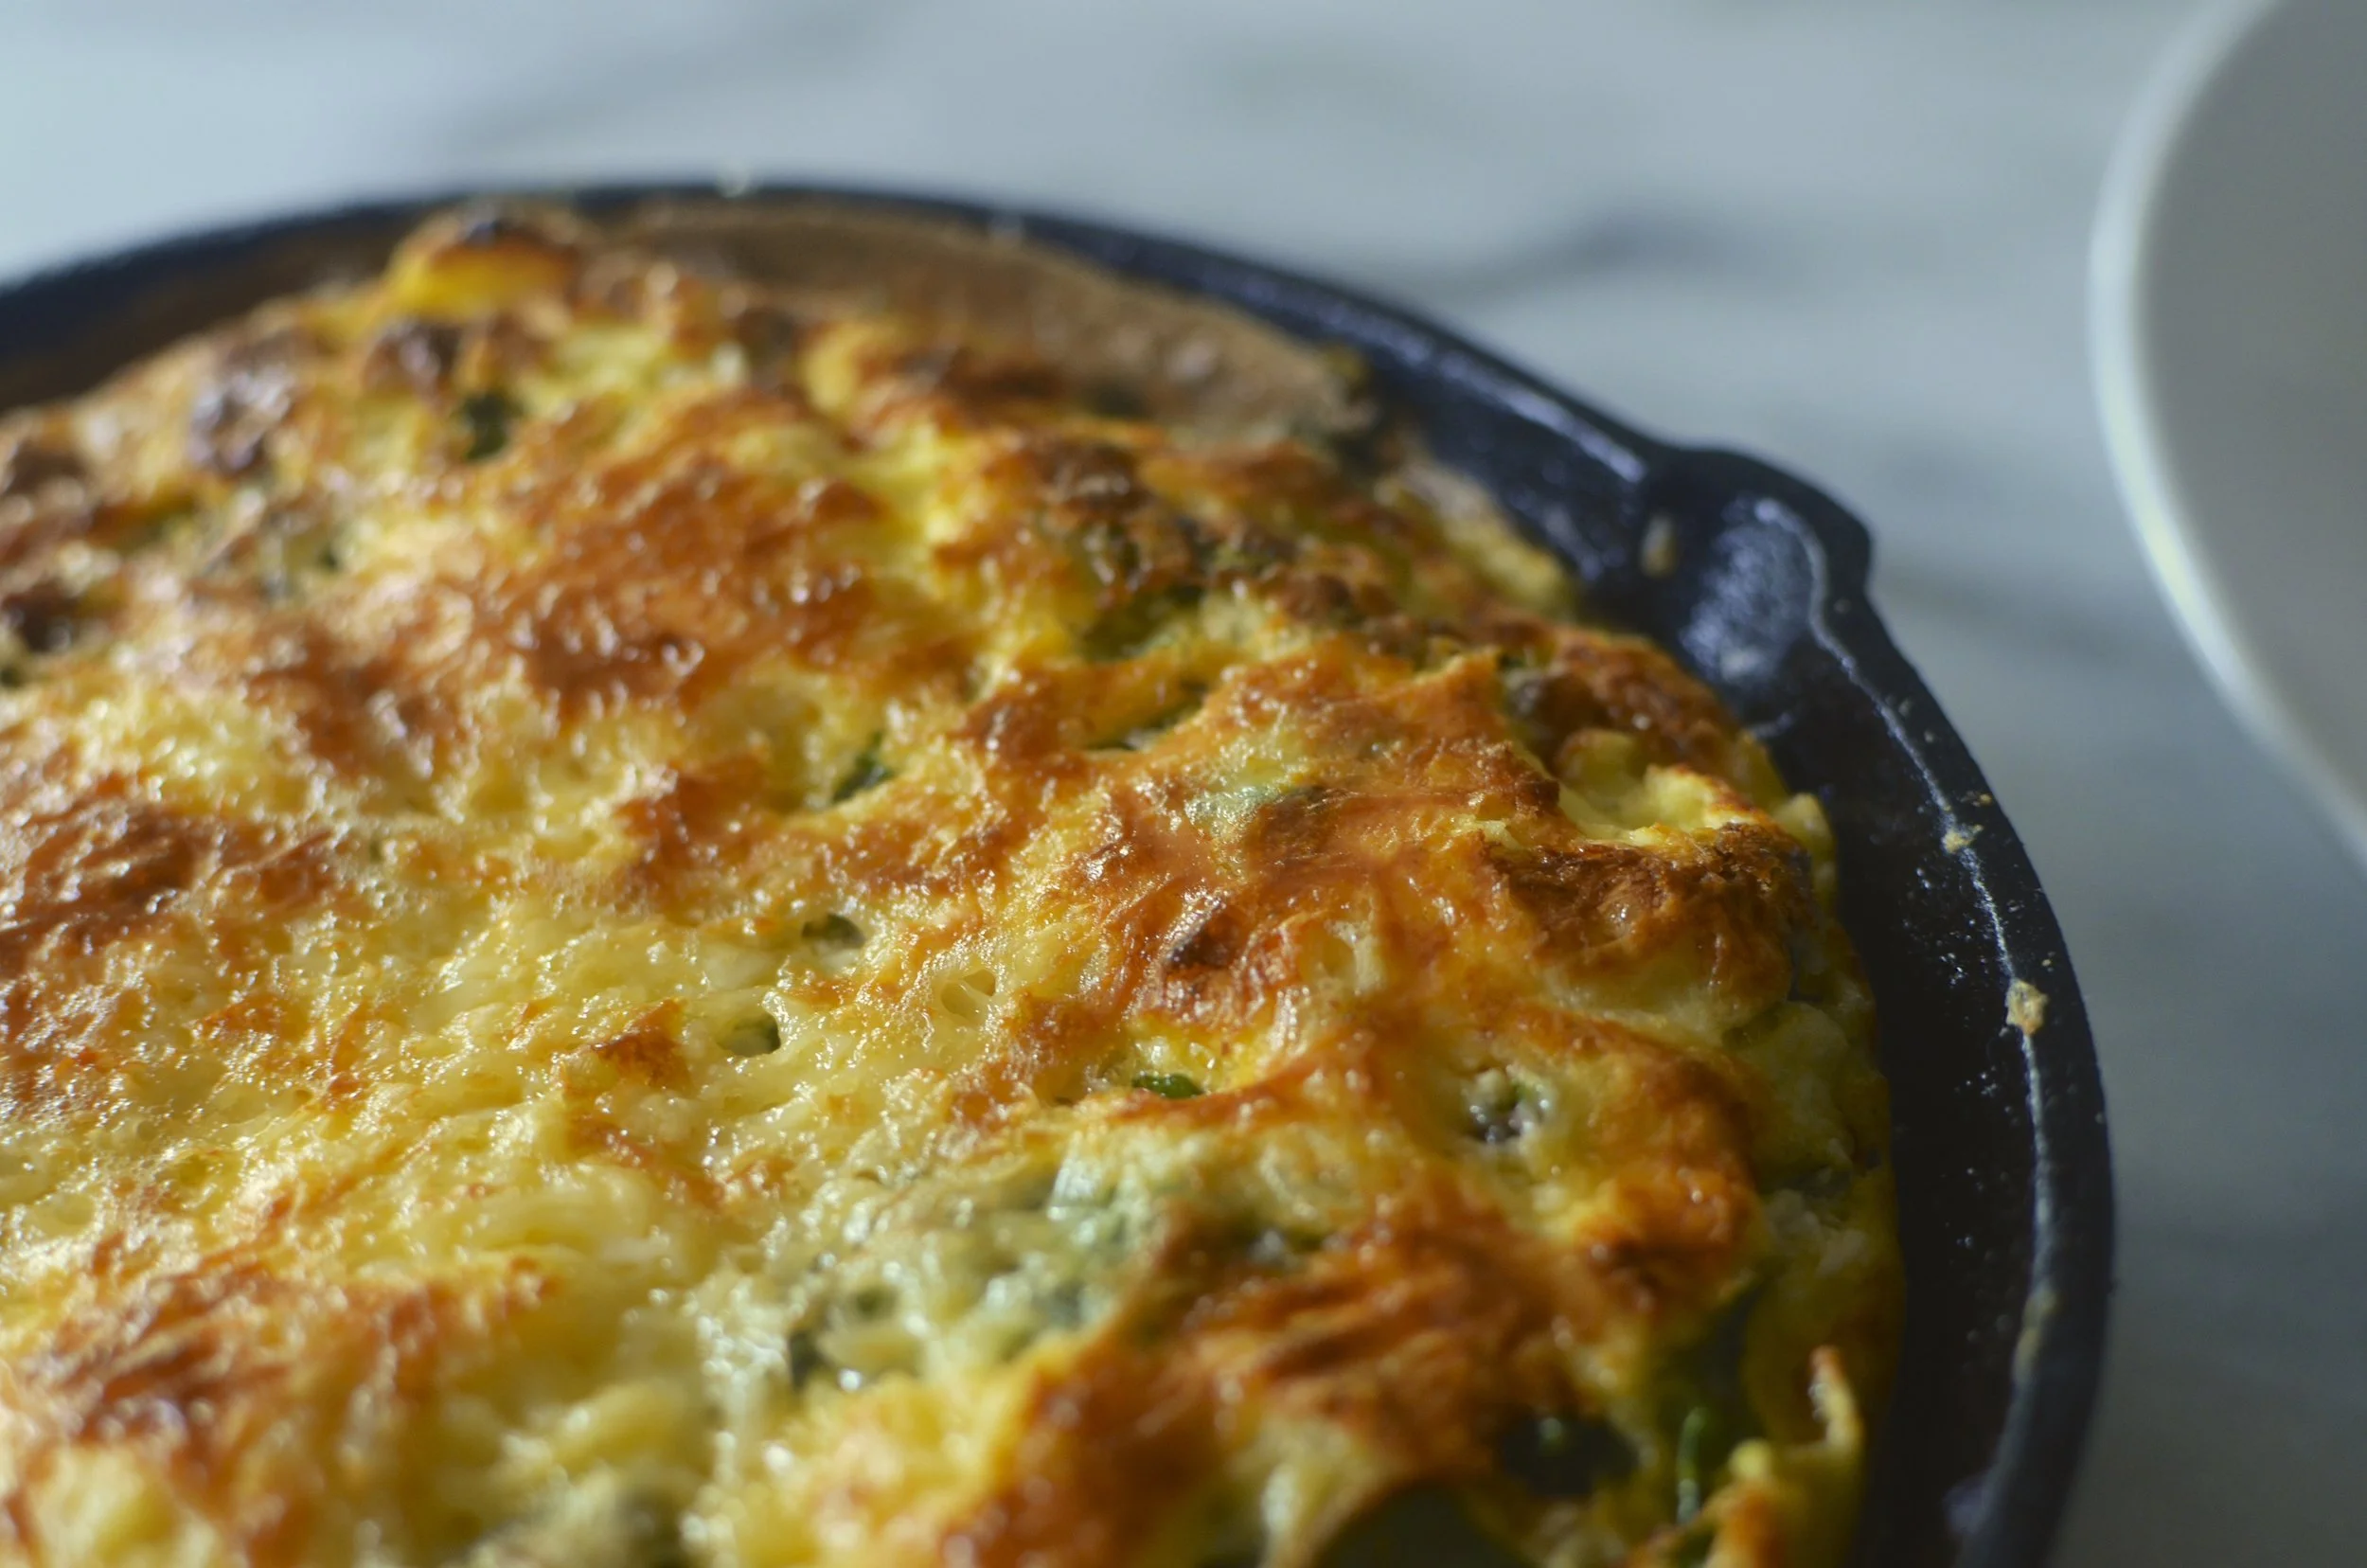
hakuna frittata
Sometimes plain ol'eggs don't cut it. Spending a few extra minutes on your breakfast can transform your scrambled eggs into a deliciously puffed frittata.

If you follow me on my personal instagram, then you know I love a good brunch moment. Whether it's my avotoast or a frittata, hosting a cute brunch is one of my favorite ways to show people that I appreciate them. Today, I made a special #ketofriendly frittata for one of my best friends Rosie. She just got back from a week long trip being a camp counselor and was telling me about the struggles of eating keto while in the midst of kids being served carbs and sugar for every meal. I knew she was coming over for brunch today, so naturally I had to test out the recipe first, so I made mini frittata and took it to my gym. They loved it!! It was gone within 10 minutes, but then again, take any sort of healthy egg dish to a group of 4 trainers and it'll be gone!
Frittatas are my go-to because they all start the same, whisked eggs, a meat, and some sort of veggie and cheese. Throw it all together and pop it into the oven and in 10-15 minutes you have the perfect brunch dish. Here's what I used for this one!

- 4 eggs
- 1 cup of shredded kale
- 2 chorizo links
- 2 tablespoons of goat cheese
- 2 tablespoons of milk (or half&half)
- salt and pepper
- 1/4 grated cheddar cheese
I start by putting the chorizo in a cast iron skillet that's been sitting over medium high heat for about 3 minutes, or until ripping hot. I let the chorizo link sit for about a minute, until it starts to sear on the underside, and you see it start to brown.
While the chorizo is cooking away, I shred kale. Using a really sharp knife, cut the kale in about 1/8" strips. Once the chorizo is browned and crumbled, add the shredded kale and mix until combined well over medium heat.
So, now on the best part-- the eggs! In a large bowl, crack four large eggs and add the goat cheese and milk. Using a large whisk I beat the eggs until the goat cheese and milk are combined completely, and add salt and pepper. Once they're combined, pour over the kale and chorizo, and top with cheddar cheese! Then pop everything into the oven for 12-15 minutes at 325. For the last three minutes, set your oven to broil and don't take your eyes off it! As soon as the top has browned, take it out! Let it sit on the counter for about 5 minutes, and then slice like a pie and serve!

There are so many different flavor combinations -- instead of chorizo use bacon and instead of kale, use broccoli! The only constants are the eggs, and the oven. Some of my favorites include bacon, jalapeños, cubed potatoes, and cheddar cheese. The beauty of frittatas is that there is no wrong answer (unless you add like, fish, then ew. Stop.) For an even more brunch-y feel, lightly dress some baby spinach or arugula and put it on top of the frittata!
gnocchi gang gnocchi gang gnocchi gang
There's gnothing better than gnocchi. Is it pasta? Is it potato? Either way, it's 100% delicious.
Hi friends! It's been awhile, but glad to be back! Life got in the way a bit, and that's totally not a valid excuse but I'm back and cooking up a storm of posts! This week, I was inspired by a friend to make gnocchi! Soft delicate little pillows of potato fortified with flour and an egg, and I'm so glad I did. It's super easy, and pairs so well with a variety of sauces. My favorite is just sauteed in browned butter with snow peas, pancetta, and thinly sliced yellow necked squash. So simple and so delicious.
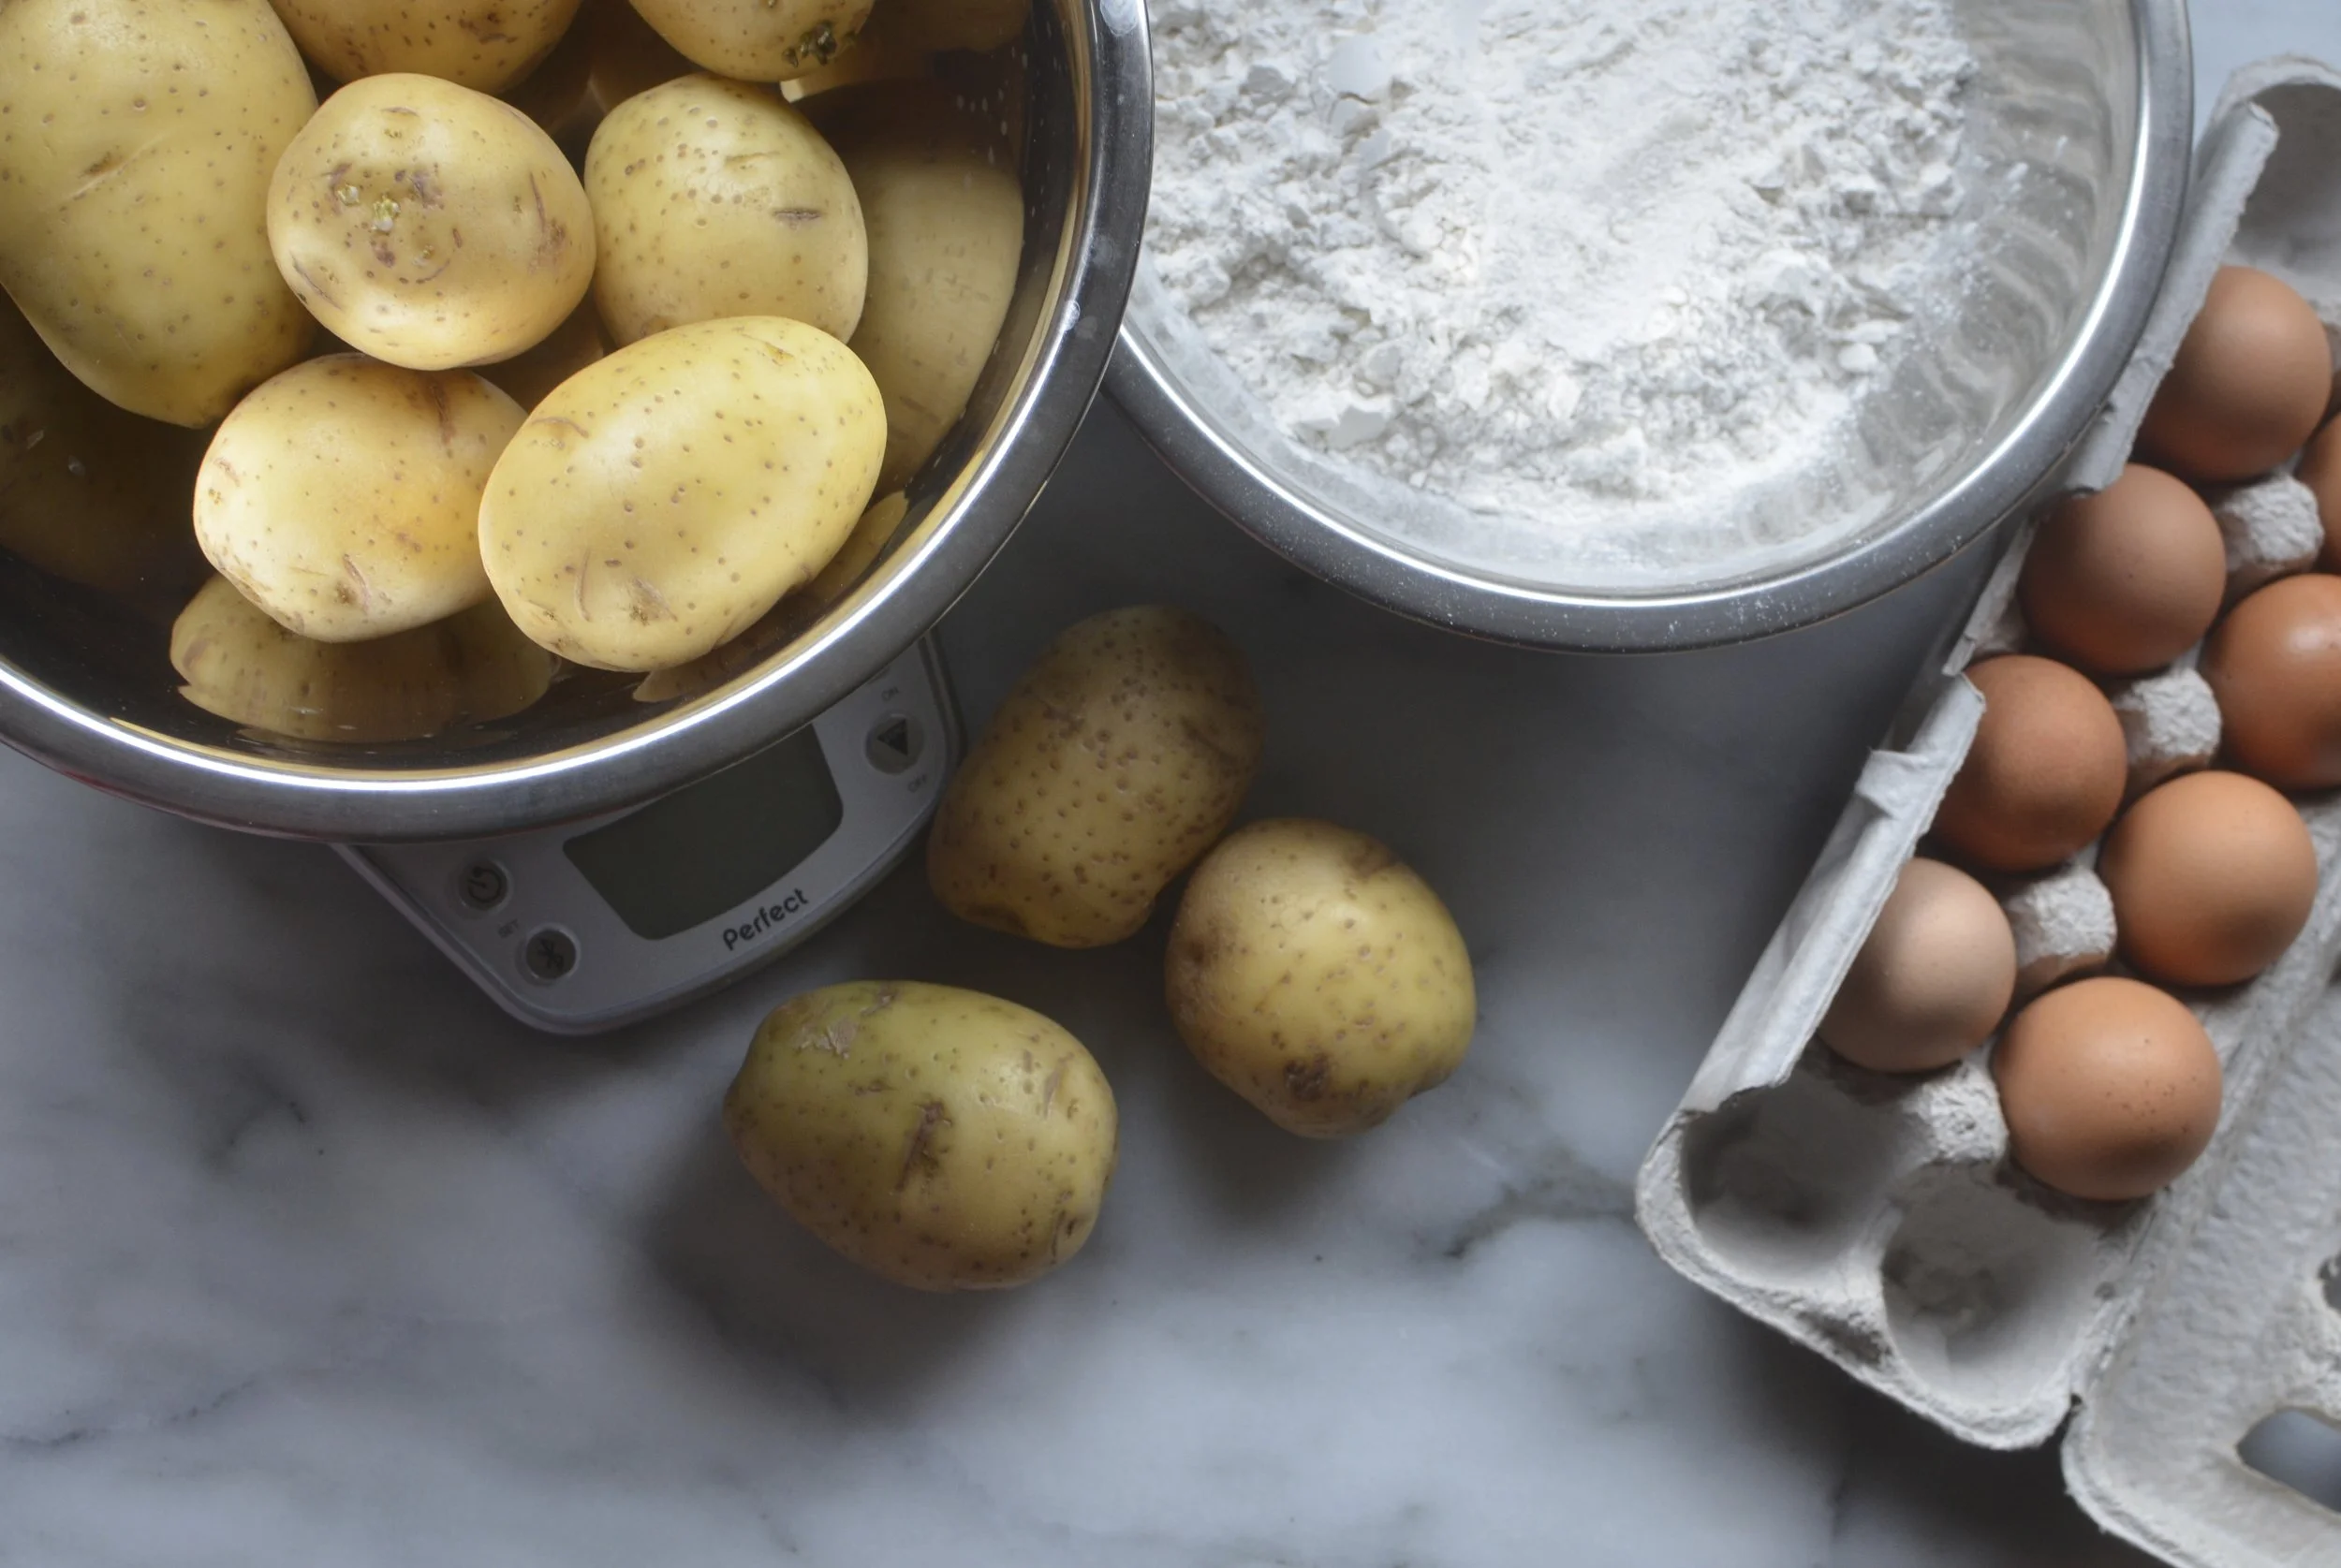
Here's what you need for the gnocchi:
- 2 pounds Yukon Gold potatoes
- 2.5 cups flour
- 2 large eggs
That's it. Seriously. Start by scrubbing the potatoes down, just to get the extra dirt off of them, and putting them in a medium stock pot with just enough water to cover them completely. Don't peel the potatoes! Boiling them with the skin on protects the flesh from water, which is gnocchi's enemy. Partially cover and boil for about 35 minutes or until they're fork tender. Strain, and let cool until they're cool enough to handle.

Once the potatoes have cooled, peel them! I just used my hands, but you can definitely use a pairing knife or those fancy potato peeling gloves. After the potatoes have peeled and cooled a bit more, use a potato ricer, or a cheese grater (the side with the medium holes) to grate the potatoes! If they're still feeling a little wet, just pat them down with a paper towel.

After you've made sure the potatoes have expelled their extra water, mound them on your counter like you would flour while making pasta, with a little well in the center. Then add the flour on top of that, maintaining the well in the center. Crack the egg into the center, and beat with a fork slowly incorporating the flour and potato and forming a shaggy dough. Careful not to over knead the dough, you don't want to the gluten in the potato to over activate, the key to good gnocchi (yes, failed pun there, I know.)


The dough should be a nice, smooth consistency. Using the bench scraper (or a very sharp knife) cut about an inch and a half off of the dough and roll between your palms on the counter forming a rope. Using the bench scraper again, cut the rope in one inch increments. From here, you can crimp with a fork but I prefer just leaving them alone. They're more rustic, easier, and just prettier. Throw them into a pot of boiling water and cook until the float to the top, about 3-4 minutes. That's it! So easy.
From there, toss the gnocchi in your favorite marinara sauce, alfredo sauce, or just butter. My favorite is with brown butter- melt two tablespoons of butter in a medium frying pan on medium high heat until the butter turns a golden brown and nutty- then set aside. In the same pan, add the pancetta and render out the fat. Add frozen peas, and thinly sliced yellow neck squash. Once the squash has gotten crispy on the edges, and the pancetta is browned, add the cooked gnocchi. Toss, and drizzle with brown butter. Garnish with freshly grated parmigiano reggiano, salt & pepper.


Aside from pasta being one of my comfort foods, gnocchi has quickly jumped the ranks. Just like it's cousin pasta, it's so versatile and delicious enough to eat on it's own. This recipe makes enough to feed at least 6, so the next time you want to have lunch for a week or throw a dinner party give gnocchi a try!

Remember that series on E! "Kourtney and Kim Take New York"? Then they took Miami, and then New York again? Last month, I decided that sauté+rosé was going to follow in the famed footsteps of the most infamous reality TV family and I took New York.
One of my dearest friends, Lauren, is getting married in October and I (am choking back tears while writing this SORRY I'M EMOTIONAL) get to help celebrate the big day as a bridesman! So fun, right?! I planned a trip out to NYC to meet the rest of the wedding party and celebrate the best way I know how. Food and wine. From the moment I stepped of the plane and the moment I got back on the plane I was eating. So much food, so little time!!
I stayed at this great AirBnB in Williamsburg! So close to so many great restaurants, and my host gave so many great recommendations but his biggest tip was to explore the neighborhood! So after I dropped my luggage off, I found a cute pizzeria and had the first of many slices of pizza. A traditional Neapolitan style pizza and it was SO good. With 3 locations in NYC and a few across the world, Motorino Pizzeria does it right! This pizza seriously tasted like it came straight from Naples. I had the Stracciatella, a white pizza with cherry tomatoes and basil.

The crust was so crisp and there wasn't even the slightest taste of yeast in the dough. I was so ready for a nap, I walked right back to my AirBnB and chilled until it was time for the next meal. Our original plan was to eat in Queens, where I would be meeting Lauren fiancé Nick for the first time, but after a marathon of Queer Eye, Nick decided to cook and honestly it was an amazing meal. I was so impressed, not because I didn't think that it would be a great meal but because Nick had taken it upon himself to rearrange the apartment, and really made the night so special! I mean, the photo below really doesn't do the food justice but sometimes our memories are the best photographs. We had roasted chicken, on pita bread with grilled halloumi cheese (I'd never had it and OMG my life has been changed) with a fig spread, roasted potatoes, and a delicious salad with craisins, walnuts, arugula and a balsamic dressing. I mean, literally it was such an amazing meal and paired perfectly with the dirty martini that was served with it!

I really could've taken a better photo, but I was too involved with dinner to even think about it!
After dinner we tried to find a cool karaoke bar, but they were all packed! I had no idea that Queens NY was the karaoke capitol of NYC so we settled at this cute lounge and after a just chatted the night away! A perfect first day in NYC.
The next day the bridal party met to pick their dresses and have lunch. Before the fittings we had a reservation at Thep, a Thai restaurant with the cutest aesthetic!

Hanging air plants, great music and the best chicken Pad Kee Mow (stir-fried broad flat rice noodles, onions, tomatoes, bell peppers, Thai basil & egg in spicy chili sauce) I've had in awhile. The spices were so balanced, and you could really taste the coconut milk marrying the chili and each noodle was so perfectly coated with the sauce.

like, how good does that look?
After lunch and the dress fittings, a few of us just explored Manhattan until it was time to take a break and head out for a night cap. It was such a fun night catching up with old friends and meeting new friends.
We had a lazy start to the next day, so after some much needed rest we decided to head to the Brooklyn Flea for some shopping and, of course, food. This place literally has everything from vintage tinker toys, giant fur coats, vintage LV purses and so much more. It was so cute, and there was a DJ downstairs. It was truly an experience and so fun. After meandering around each booth I decided on trying the famed Ramen Burger. A burger with buns made of ramen noodles. Like, who would've thought that could be a thing!

The meat was perfectly cooked, and topped with arugula and hoisin sauce it was a beautiful marriage of the flavors but after a few bites it became increasingly difficult to eat so the bun had to go and the patty was finished. Such an experience! After eating and looking around for a few more hours I was hungry again. Because DUH. So off to get more pizza we went.
I've heard of Best Pizza via Instagram, Viceland and Facebook so I had to try it.

Seriously, how can you resist a sign like that? It's impossible.
From the moment you walk in, you're met with the smell of crust baking and cheese melting and the sounds of hip-hop playing. It's such a cool shop! The walls are covered in paper plates with drawing of their patrons from around the world. I had to go with my favorite pizza - pepperoni.

I really think this was my favorite meal during my trip. The crust was perfect, the sauce was perfectly seasoned and the pepperoni added the perfect amount of spice. If I have one regret is that I didn't eat more than one slice. There's something so welcoming and warming about a good slice of pizza and a glass bottle of Coke especially when shared with a lifelong friend. I may or may not have a Best Pizza teeshirt, too. I couldn't resist!
I had such an amazing time in NYC and can't wait to spend more time there this year exploring more restaurants and celebrating love! If you have any recommendations leave them in the comments below.

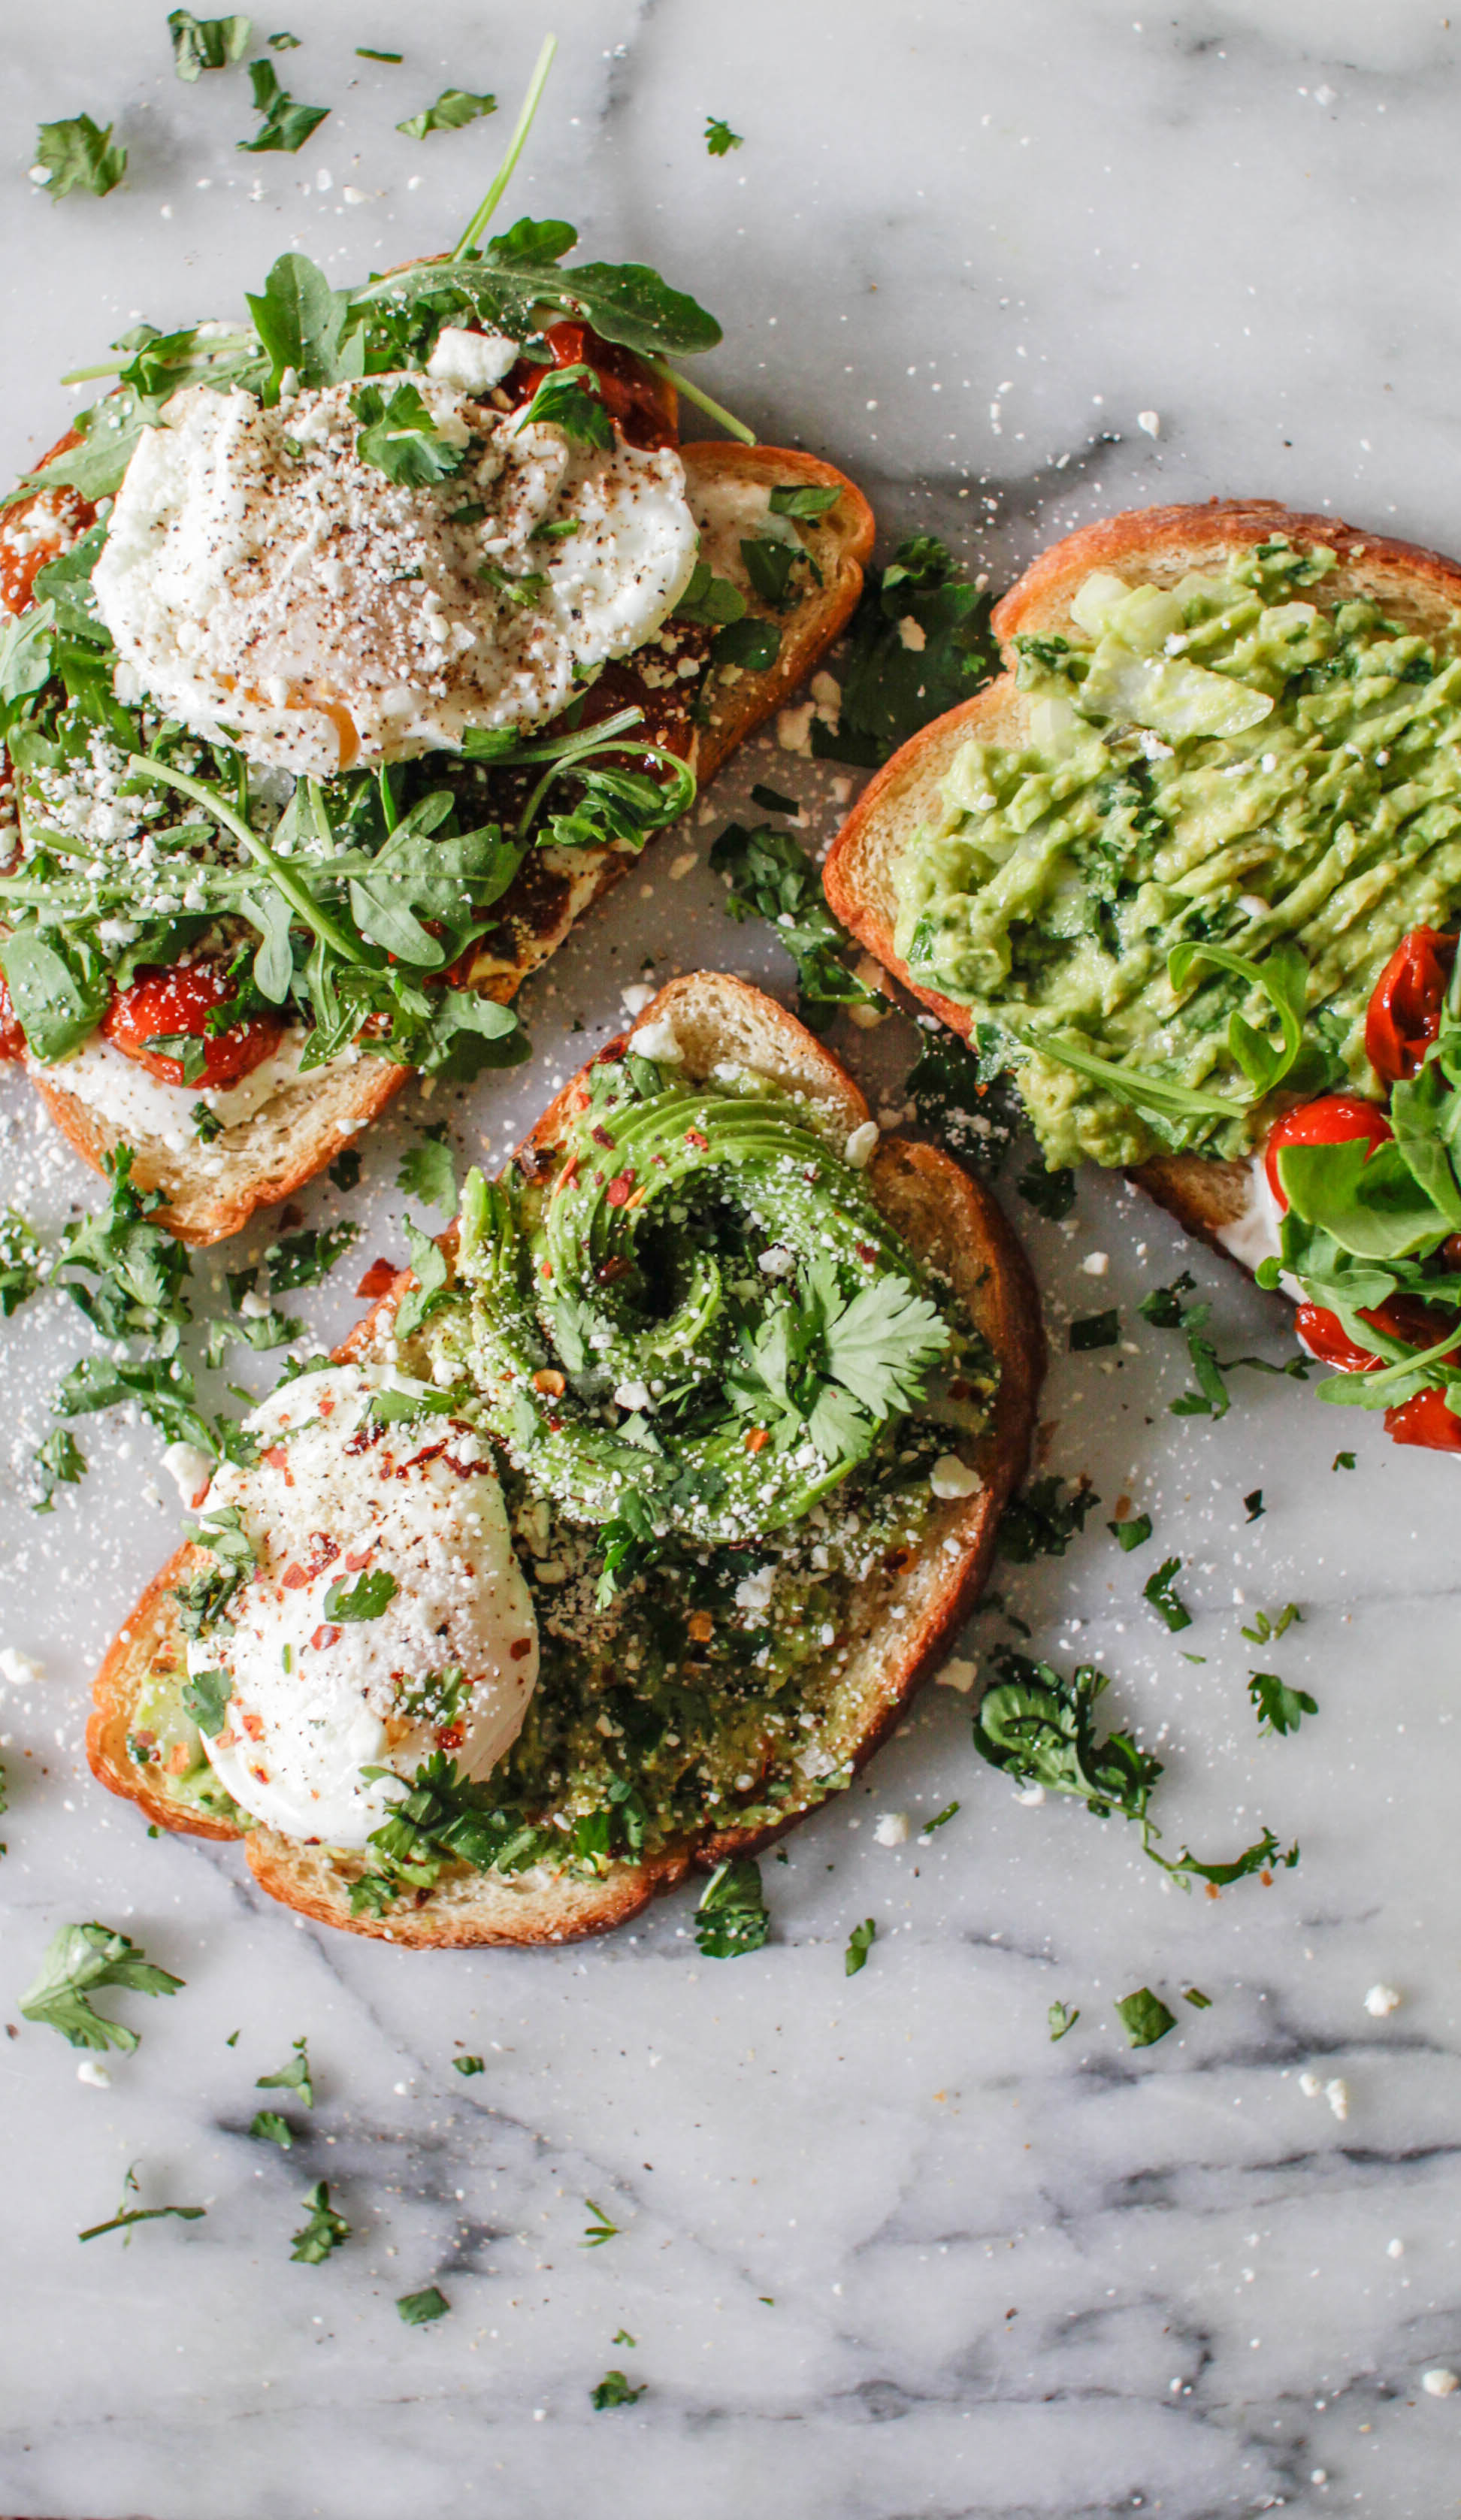
YAS toast
It seems like over the last few years brunch isn't just an amalgamation of breakfast and lunch. It is an entirely new category of foods that are either sweet and savory and always enjoyed with friends.
At the center of this "movement" is the avocado. It's almost cult following has launched it from mere accoutrement to superstar of the plate. Known for it's mild flavor that pairs well with a variety of other flavors it's also super healthy! They actually contain more potassium than banana's and are packed with heart healthy monounsaturated fatty acids like the oleic acid that linked to reduced inflammation and been shown to have beneficial effects on genes linked to cancer. Aside from the health benefits, it really just tastes great!
My favorite brunch dish, either at a restaurant or at home is avocado toast, or as I like to call it, "YAS toast" Yolk, Avocado, Spice toast. It pairs just as perfectly with a mimosa as it does with a cup of coffee. For my veggie friends, just take the egg off and it's just as delicious. I have it both ways depending on my *mood* that day!
Here's what you need:
- avocados
- cilantro
- radishes
- jalapeños
- white onion
- lime
- one garlic clove
- red pepper flakes
- eggs
- bread (you can use whatever you have on hand, but I love using flat bread)
Dice the onion, chop the jalapeño, mince some cilantro and garlic and throw them into a bowl with salt and pepper to taste! Scoop out half of one avocado (reserving the other half for a rose) and add to the bowl! Mix with the juice of one lime and you're ready with the base of your YAS toast. (that's also my go-to guac recipe - your welcome). To really let the flavors come together, I let the guac sit for about 20 minutes at room temperature.
While the guac is patiently waiting to be used, I start the avo-rose:

- Cut avocado in half and peel off the skin. Lay one half of the avocado, cut side down, and slice the avocado thinly. You want the slices to be quite thin so that they’re easier to shape. If you want a smaller rose, you’ll only want to use 1/2 of the slices. Use all the slices if you want a large flower.
- Fan out avocado slices so that they form a long line with the slices overlapping each other. I usually remove the small slices from the ends because they are difficult to shape. Starting from one end, curl avocado slices toward the center. Continue curling the avocado slices until you get a rose.
Once the rose is done, I toast my bread and start my eggs. You can definitely poach your eggs, but I love a good fried egg on toast. Something about the crispy ends of the egg whites and the yolk spilling everywhere make such a satisfying experience. For my veggie friends, leave out the egg! So easy!

Next, top the toasted bread with the guac, placing the rose on one side and the egg on the other! For my veggie friends, leave off the egg! Sprinkle with feta, red pepper flakes, and thinly sliced radishes! For a finishing touch, arrange the cilantro leaves and enjoy!

apple tart
warm apples coated with apricot preserves on a crispy puff pastry
Sometimes, especially when I'm working from home, I have the urge to wake up early and cook something. Not necessarily breakfast but something that requires some thought. Maybe it's a subconscious way of activating my brain, or maybe I'm crazy. Often times, I wake up craving something I saw on the Food Network the day before. Today, it was Ina Garten's Apple Tart. I had the apples, some puff pasty in the freezer, and apricot jam in my fridge. It's simple, easy, and SO delicious.
In high school, my brother would make this recipe completely from scratch- no shortcuts. Today, I wasn't feeling that adventurous. Here's what you need if you're making it from scratch or using the frozen puff pastry:
For the pasty:
- 2 cups all-purpose flour
- 1/2 teaspoon kosher salt
- 1 tablespoon sugar
- 12 tablespoons cold unsalted butter, diced
- 1/2 cup ice water
For the apples:
- 4 large Granny Smith apples
- 1/2 cup sugar
- 4 tablespoons cold unsalted butter, diced
- 1/2 cup apricot jelly or preserves
- 2 tablespoons rum, or water
To make the pastry, add the flour, salt, and sugar into a food processor (or stand mixer) and pulse until the dry ingredients have combined. Add the butter and pulse repeatedly until the butter is the size of peas. While the processor is on, slowly add a stream of the ice water until the dough comes together. Place the dough onto a floured board and kneed into a ball. Once the ball is formed, cover in plastic wrap and refrigerate for at least an hour. That's it! So simple.
While the dough is chilling (or your frozen dough is defrosting) it's time to get the apples peeled and sliced, but first preheat the oven to 400°.
The apples, for me, are the most fun part. Peel the apples using a potato peeler, and cut right down the middle. Using a sharp knife and melon baller, scoop out the core and remove the stem. Then slice the apples about 1/4-inch thick.

Once the dough is chilled (or thawed) place on a floured board and roll out about 10 by 14 inches and place the dough on a baking sheet lined with parchment paper. Once the apples are cut and the dough is rolled out, the arranging begins. Place overlapping slices of apples diagonally down the center of the tart, then repeat on either side until the tart is filled with apples! I typically have an extra apple on hand, incase I run out of slices and need to add a few extra. Once the apples are arranged, sprinkle with the sugar and dot with the cubed butter.

Bake for about 45 minutes, watching carefully- the dough should be slightly raised and the apples starting to caramelize on the edges. When the tart is done, heat the apricot jelly/preserves together with about a teaspoon of rum and brush the apples and pastry with the mixture. That's it! Remove the tart from the pan and onto a cooling rack!

"How easy was that?" I love this recipe so much. It's super simple and the end result looks like you've been baking all day. The butter mixed with the sugar create the perfect caramelization that compliment the tart Granny Smith apples so well. Definitely an elevated way to enjoy apples and caramel. When you bite into the tart, the apples have soften so much they're almost like a sauce and the pasty crunches like a sweet crisp cracker. Really is the perfect light dessert, perfect for spring holidays and gatherings!

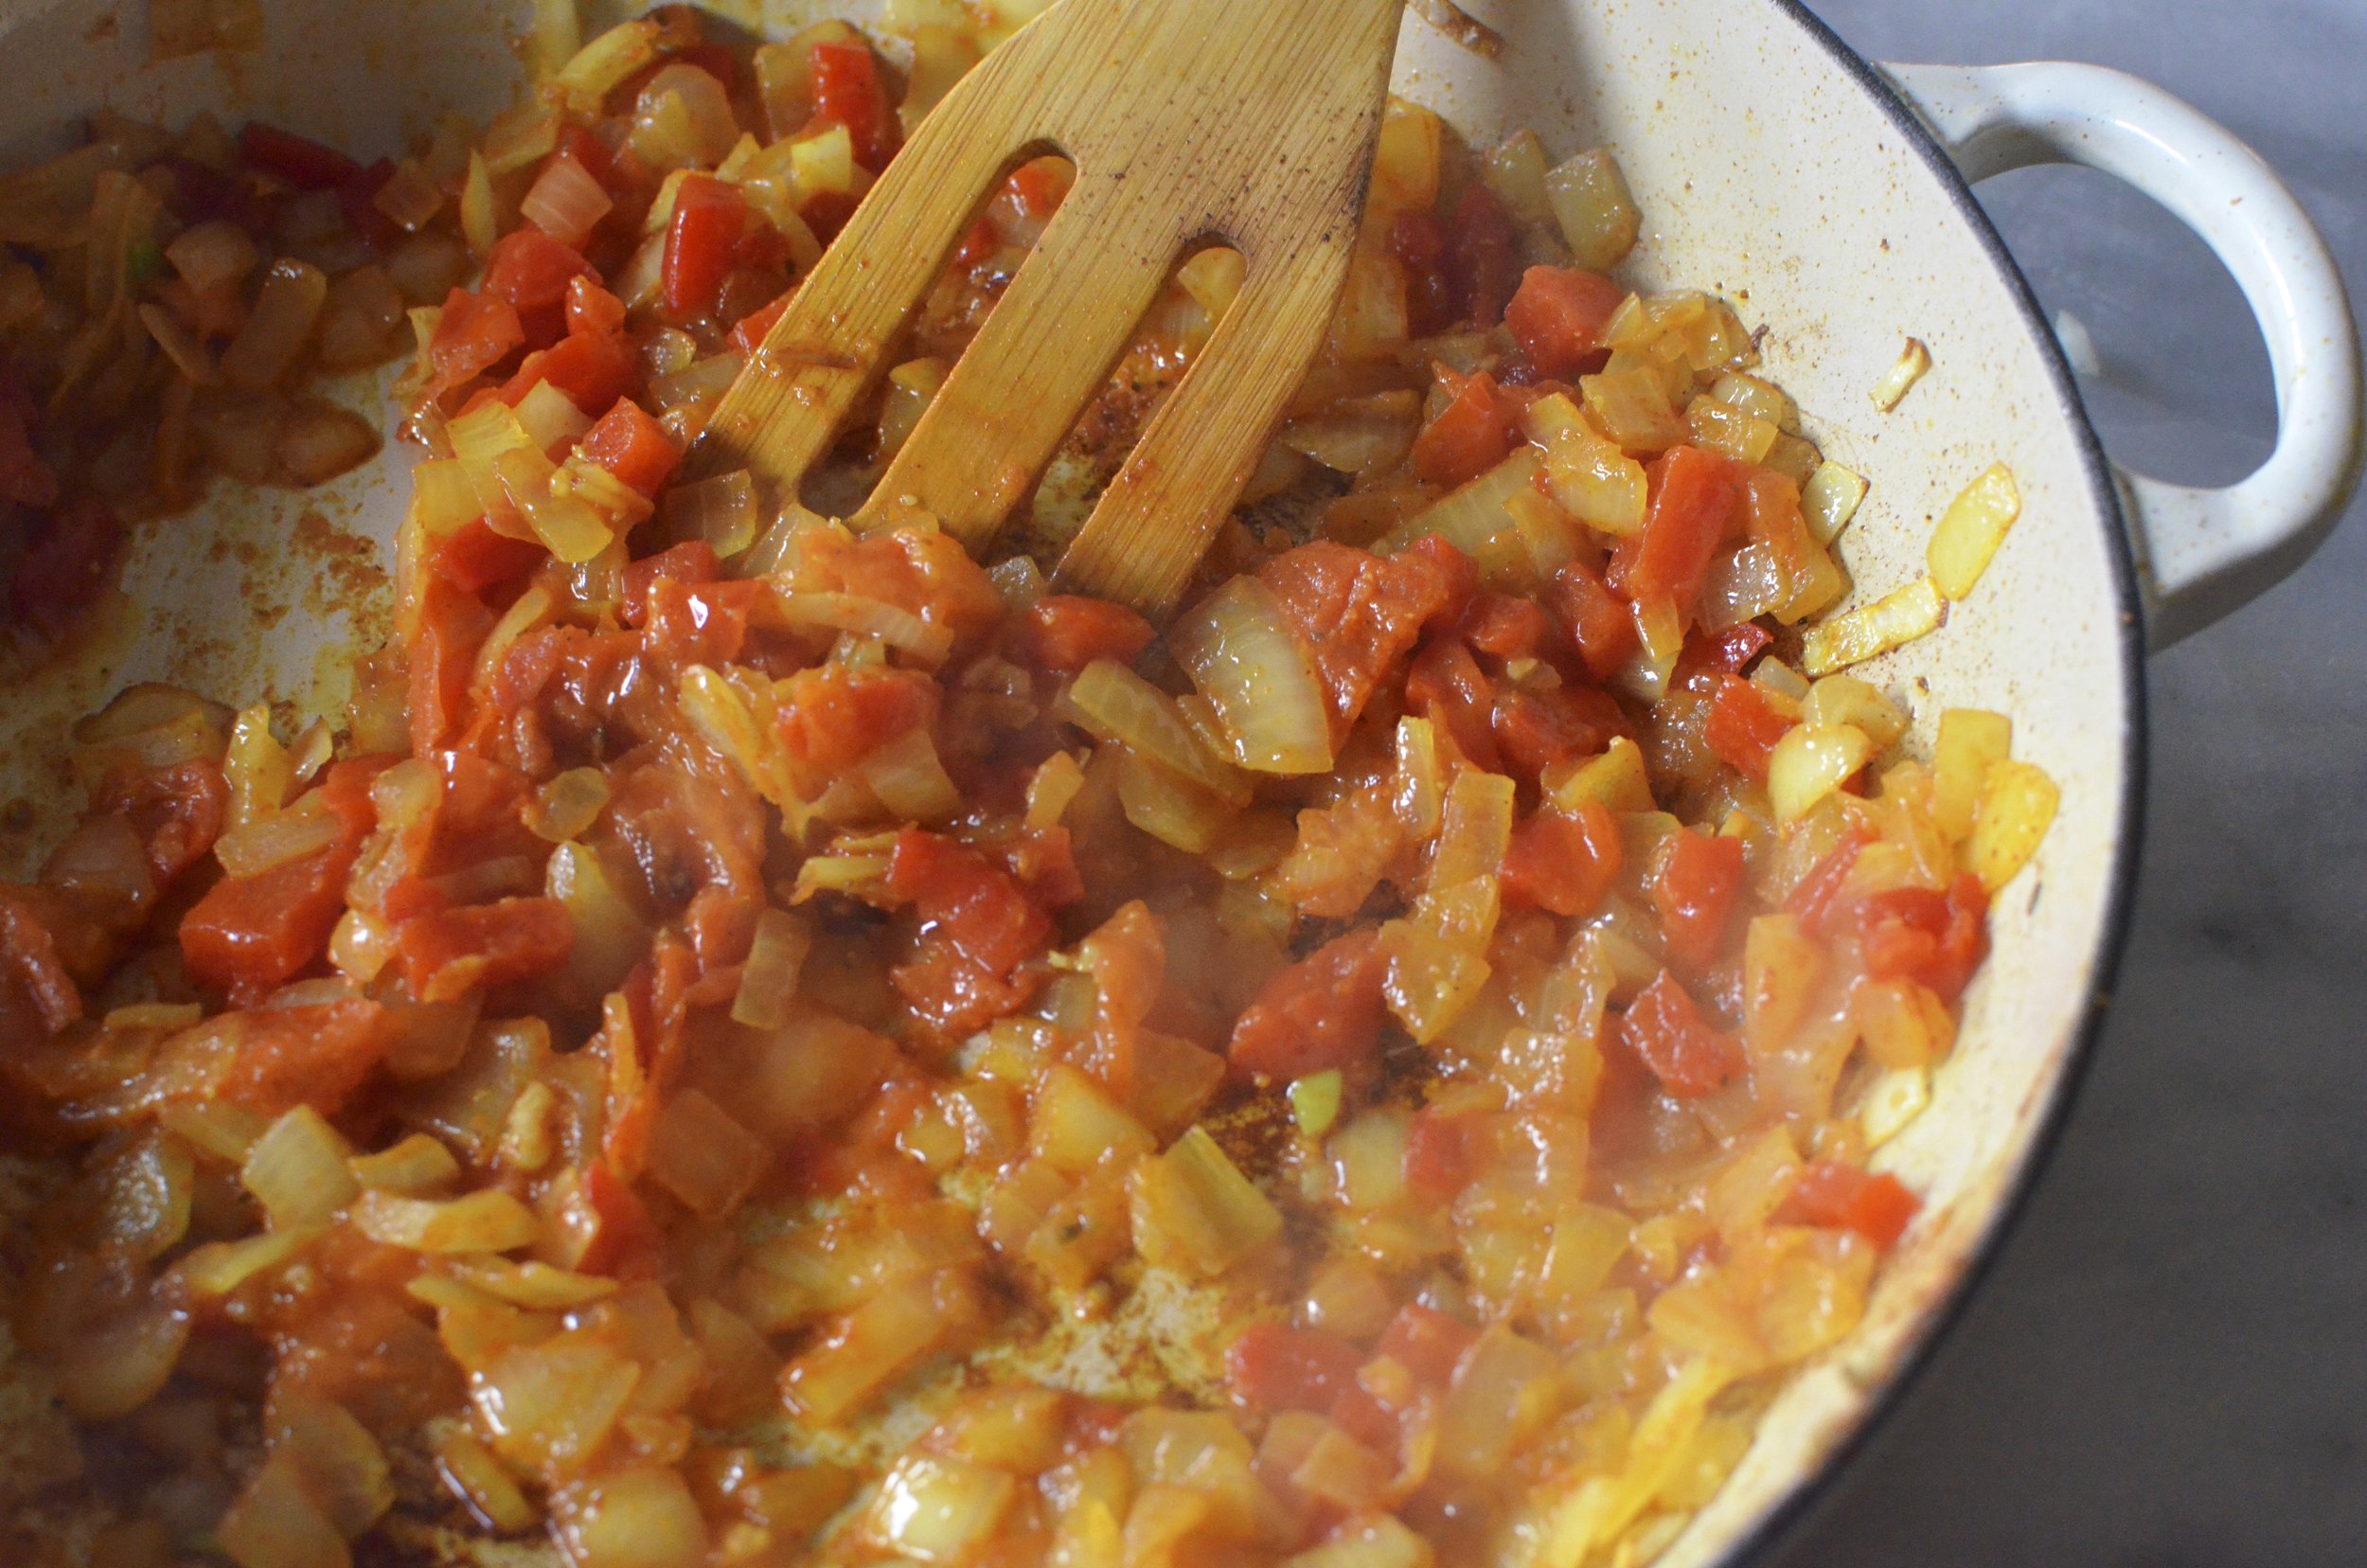
shakshuka
Literally one of the most fun words to say. Pronounced "shock-shooka", this dish is so easy to make and can be eaten for breakfast, brunch or dinner.
The origins of this dish are a little unclear, but it's consumed and loved from north Africa to the Middle East and even in Europe. Eggs poached in a spiced tomato sauce? Sign me up! Simple, easy and quick- perfect for a Sunday morning brunch and tastes like you've been working on it for hours. Here's what you need:
- 1 large yellow onion
- 4 ripe plum tomatos
- 2 cloves of garlic
- 1 28oz can of stewed tomatos
- 1 6oz can of tomato paste
- 1/2 cup shredded kale
- 1/2 cup of feta
- 3 tablespoons diced piquillo peppers
- 1 tablespoon of turmeric
- 2 tablespoons of cayenne pepper
- 2 tablespoons of sweet paprika
- 1 tablespoon of garlic salt
- 4 large eggs
It's definitely a longer list of ingredients, and I've modified them to my taste. Traditionally the dish is made with cumin and bell peppers but if you know me you know that I HATE cumin and bell peppers. Instead of cumin, I used turmeric and instead of bell peppers, I used piquillo peppers. Both mild in flavor yet add a really nice depth to the dish.
Start by dicing the yellow onion and garlic cloves and letting them sweat with the cored tomatoes and piquillo peppers in a large skillet over medium high heat. While those are sweating away, preheat your oven to 375 degrees. Then add the spices and continue to cook over medium heat until everything is coated and the spices are fragrant.
After about 7 minutes, add the can of stewed tomatoes and tomato paste and let simmer for 5-10 minutes. Once the sauce has reduced a bit, add a 1/2 cup of feta cheese and season with salt and pepper to taste. It should be about the consistency of a rich marinara sauce, and in a lot of ways this is a very similar sauce!

The next step is SO easy, and definitely the most fun part. Around the perimeter of the skillet, make little wells with a spoon and crack an egg into each crater. If you're feeding for a larger group, use more eggs! Then just pop the entire thing in the oven for about 5-7 minutes or until the eggs are set to your preference. For me, the perfect egg has a runny yolk and a completely cooked egg white. That takes about 6 minutes, depending on your oven.
Serve over breakfast potatoes and garnish with fresh cilantro and more feta cheese.
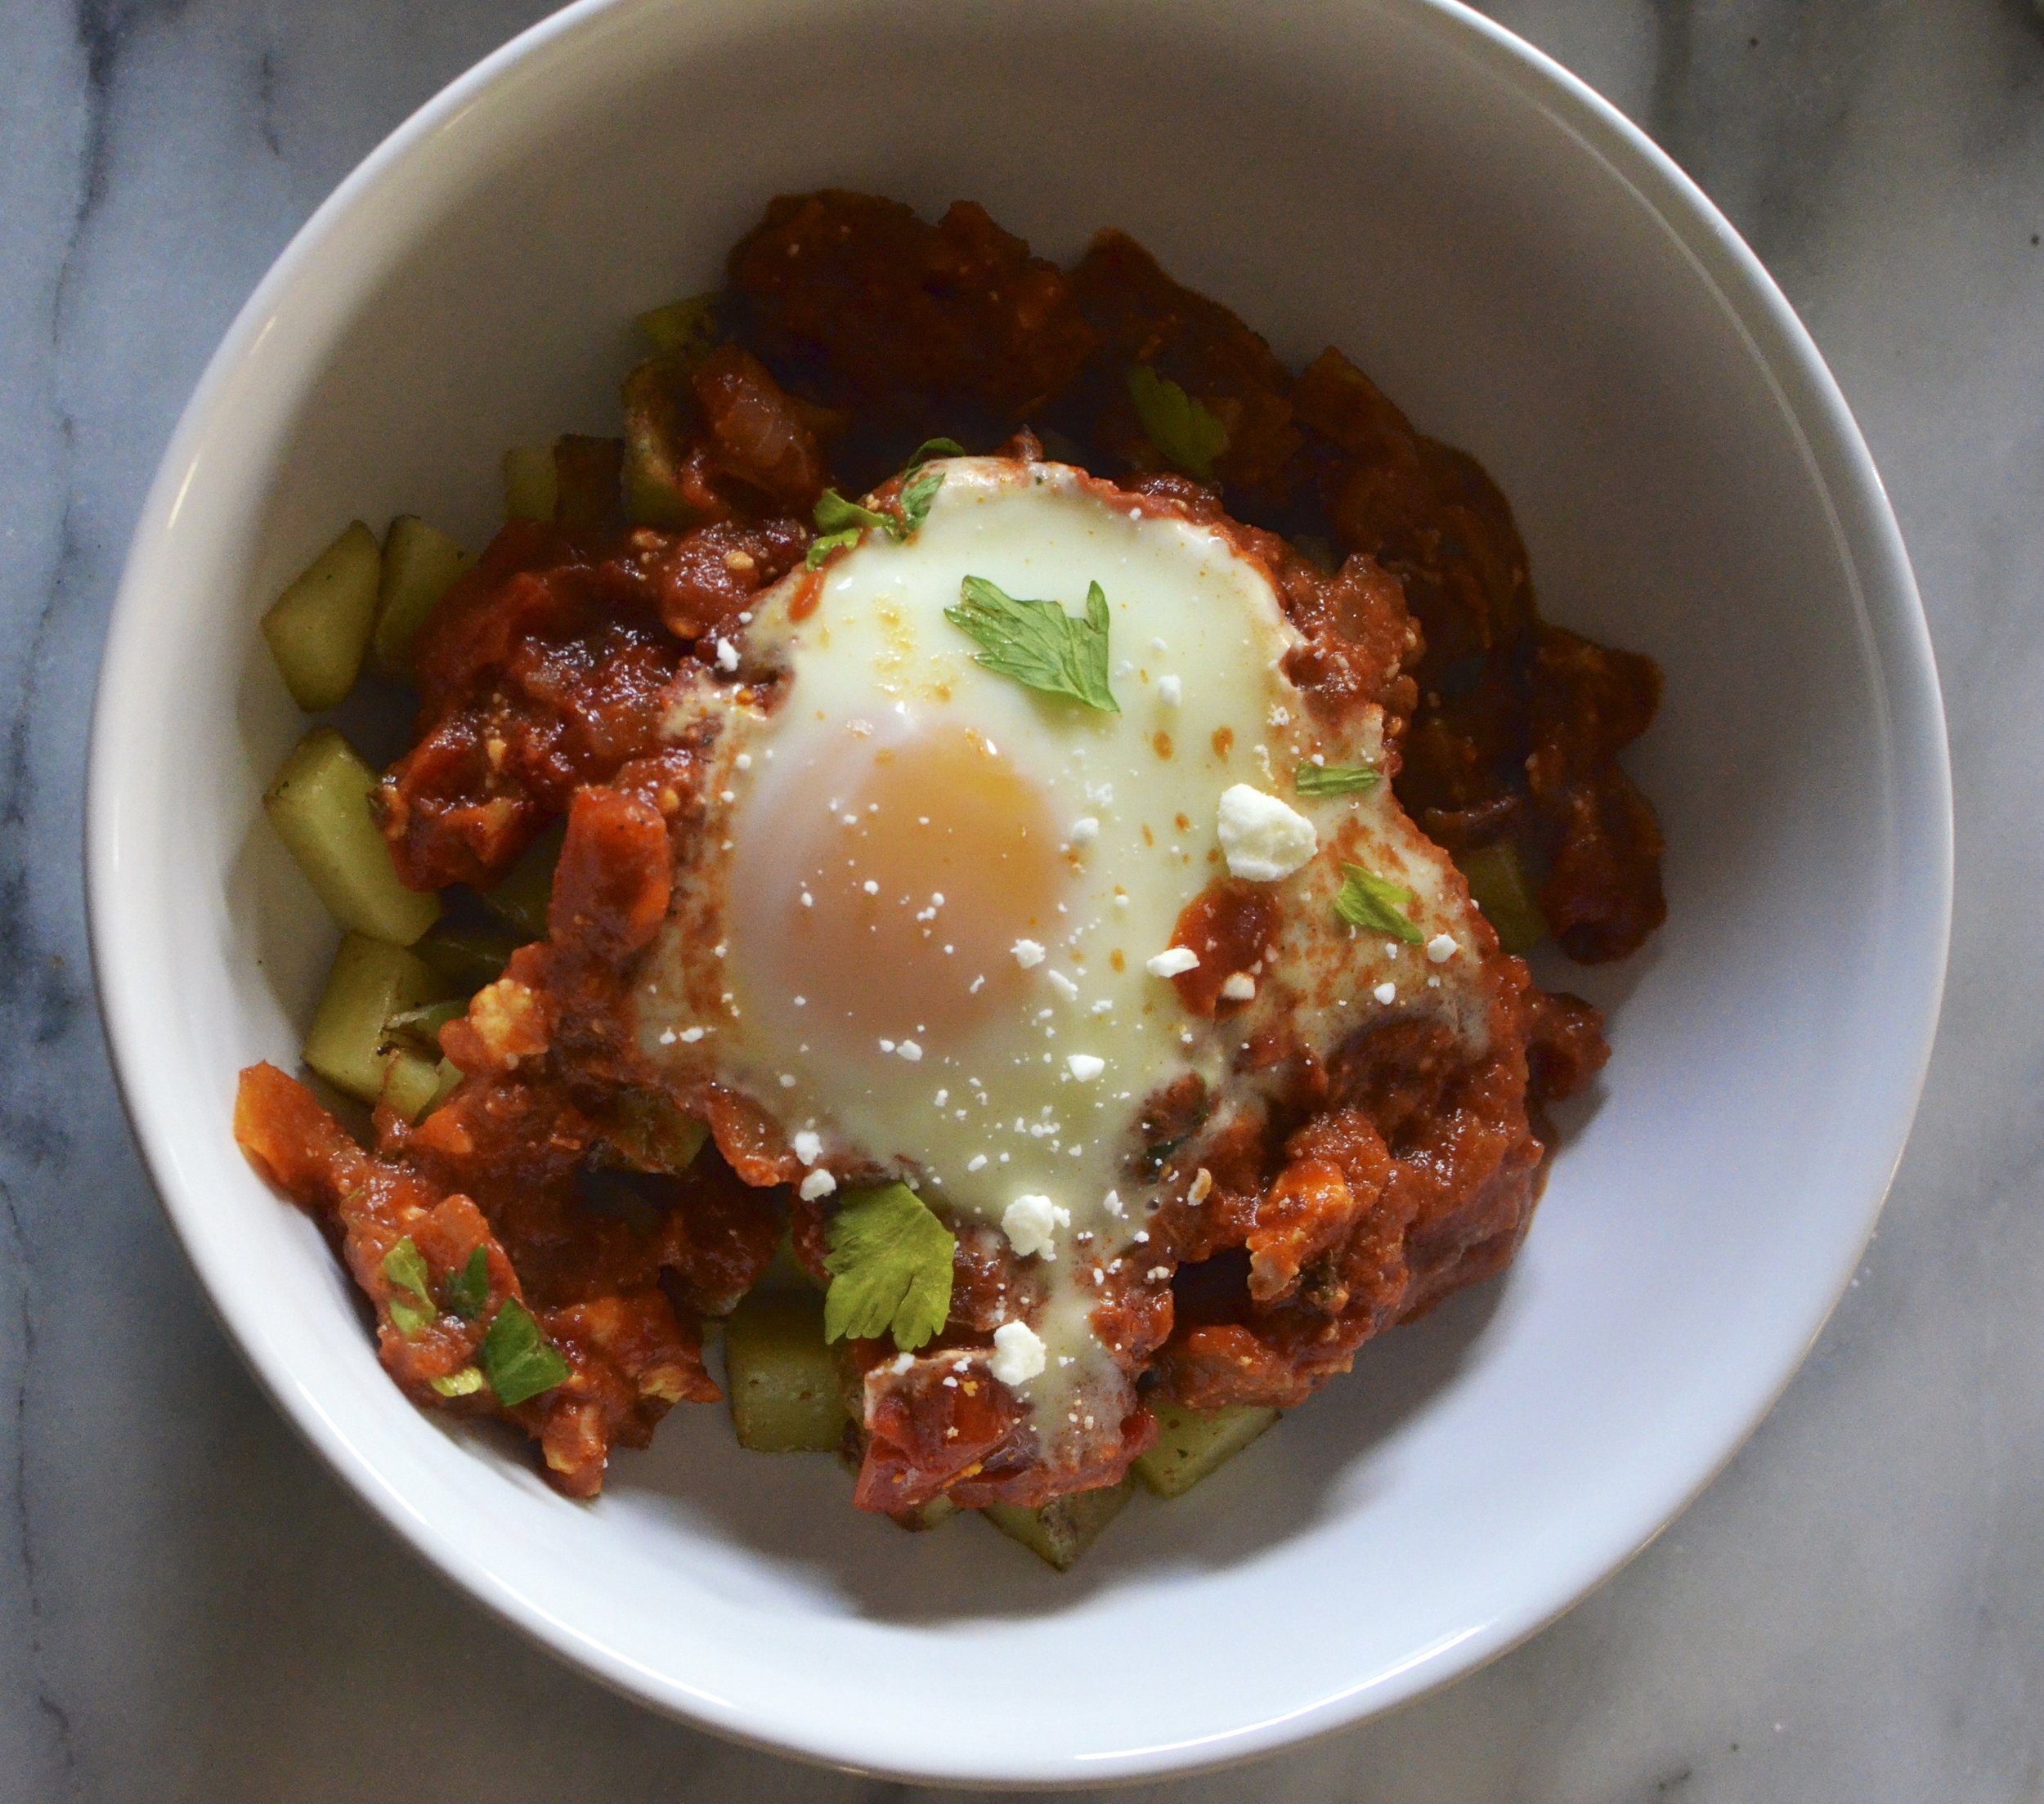
This dish is so easy, so delicious and the presentation definitely makes it a crowd pleaser! It's at the top of my brunch go-to list! What are your favorite brunch foods?
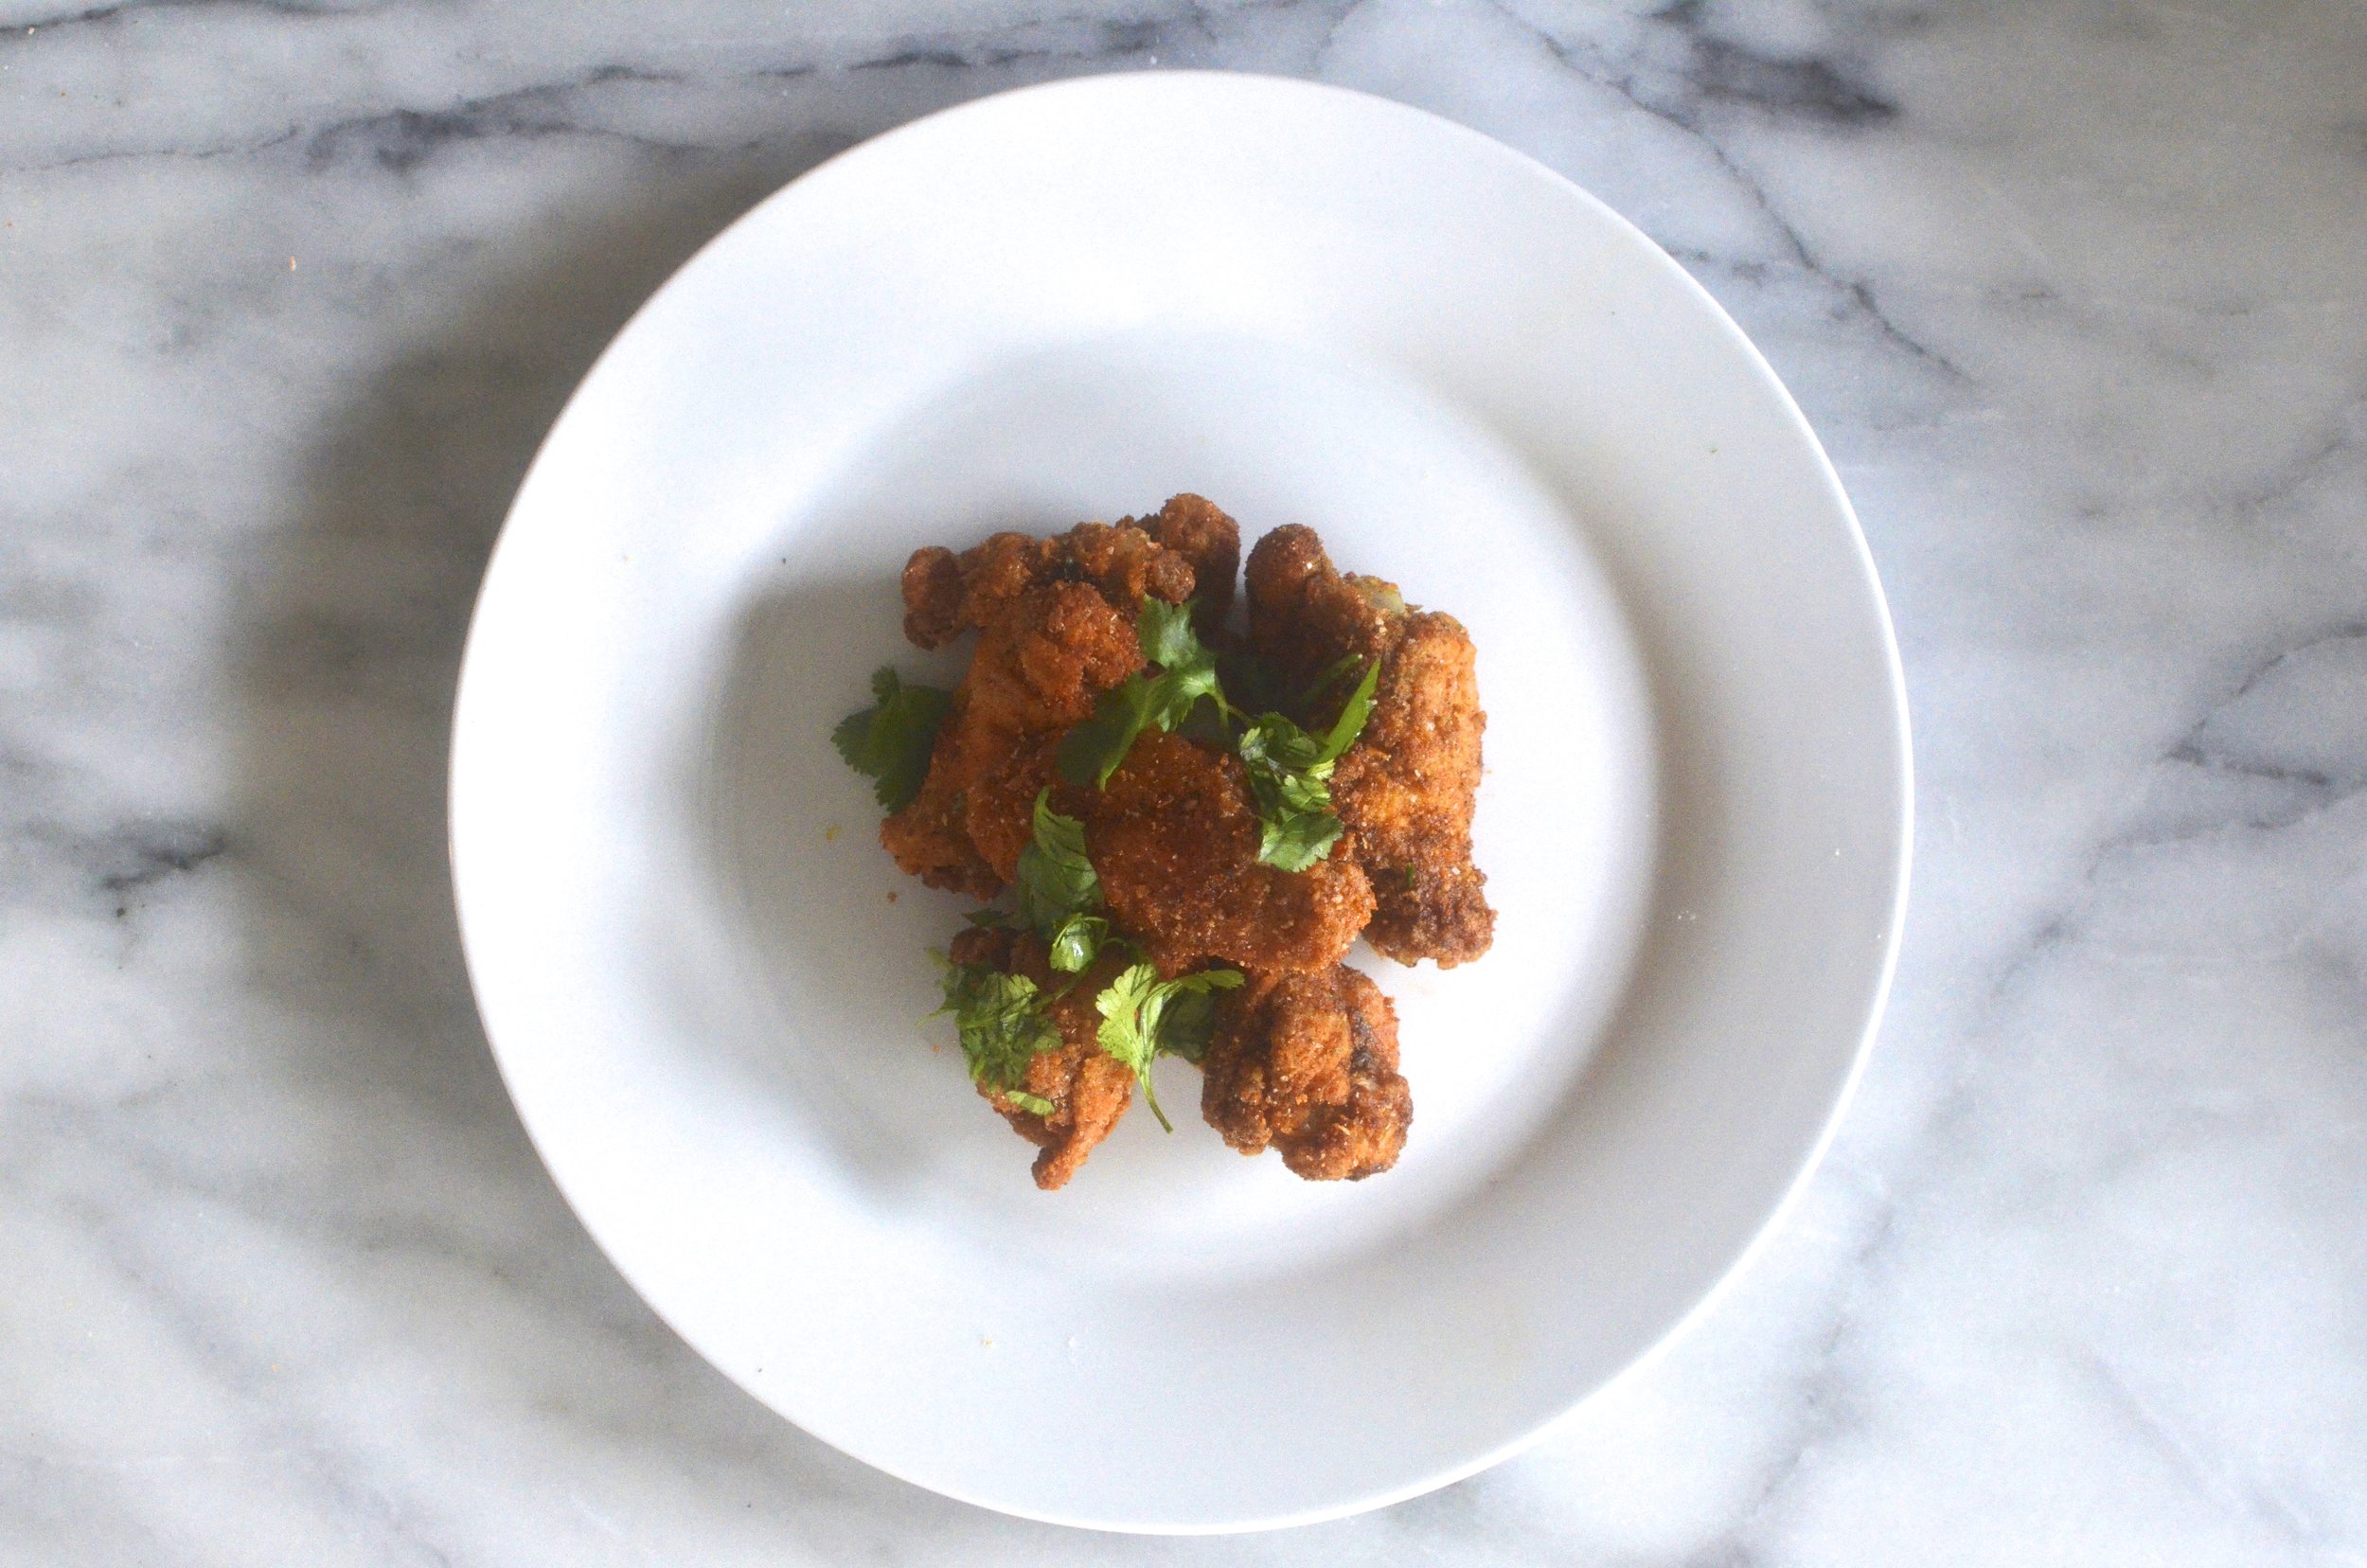
wings wings wings
About once a month I crave chicken wings and now that March Madness is upon us, that craving is alive and well. I mean honestly, is there anything better than biting into a spicy piece of fried chicken?
The crispy ends making a crunch between your teeth and the spice exploding on your tongue, it's the best part of any game-day, party, or just a Saturday. For some, wings have a sketchy reputation, seedy bars, womanizing restaurants, and daunting deep fryers horror stories, but for me, the first few wings always take me back to childhood. Weekends spent at family parties watching football or basketball games, summer picnics, and of course barbecuing by the pool - wings really bring me back!
My family lives all across the country, so weekend parties are few and far between. Until we all live near each other again, I make wings whenever I'm feeling nostalgic! I use a counter-top deep fryer (because I'm extra) but these are great baked as well!
Here's what you need:
- 1⁄2 cup flour
- 1 tablespoon paprika
- 1 teaspoon garlic salt
- 1 teaspoon black pepper
- 2 teaspoons cayenne pepper
- 2 teaspoon ground ginger
- 1 bunch of cilanto
- 10 chicken wings, tips removed
As you might've guessed from the ingredient list, these aren't traditional buffalo wings. These are ginger spiced wings! Feel free to adjust the spice mixture based on your preferences, but I like my wings spicy.
For oven baked wings, preheat the over to 425 degrees. For deep fried wings, heat oil to 325 in a large skillet or deep fryer.
Make sure your wings are prepped, cleaned, and dry. Fresh is always the best, but if you only have frozen that's totally fine! Either way make sure the wings are patted down and dry, and a little tacky so the flour and spices stick. We're not using a batter here, so no eggs are needed-- just a simple flour spice mix.
In a clean bowl (or large zip-lock bag) mix the spices and flour, and add the wings! Mix together until the wings are completely coated in the flour mixture. Remove from the mixture and set aside either until the oven or oil comes up to temp. Arrange them on a baking sheet about 1.5 inches apart and bake for a half hour, flip them and cook for another 15 minutes. Remove from the oven and season once more with salt and pepper to taste. If you like spicy, add a few more dashes of cayenne.
For the deep fryer, same thing! Remove the wings from the flour mixture and ensure the excess is tapped off each wing. Then, deep fry for 10 minutes and again, season with salt and pepper (cayenne if you're brave) while they're warm to ensure the spices stick.

These wings come out so crispy and the spices really dance around bringing a warm spiced flavor to the traditional chicken wings. Arrange on a plate and garnish with fresh cilantro! These wings are so juicy and flavorful they really don't need a sauce.
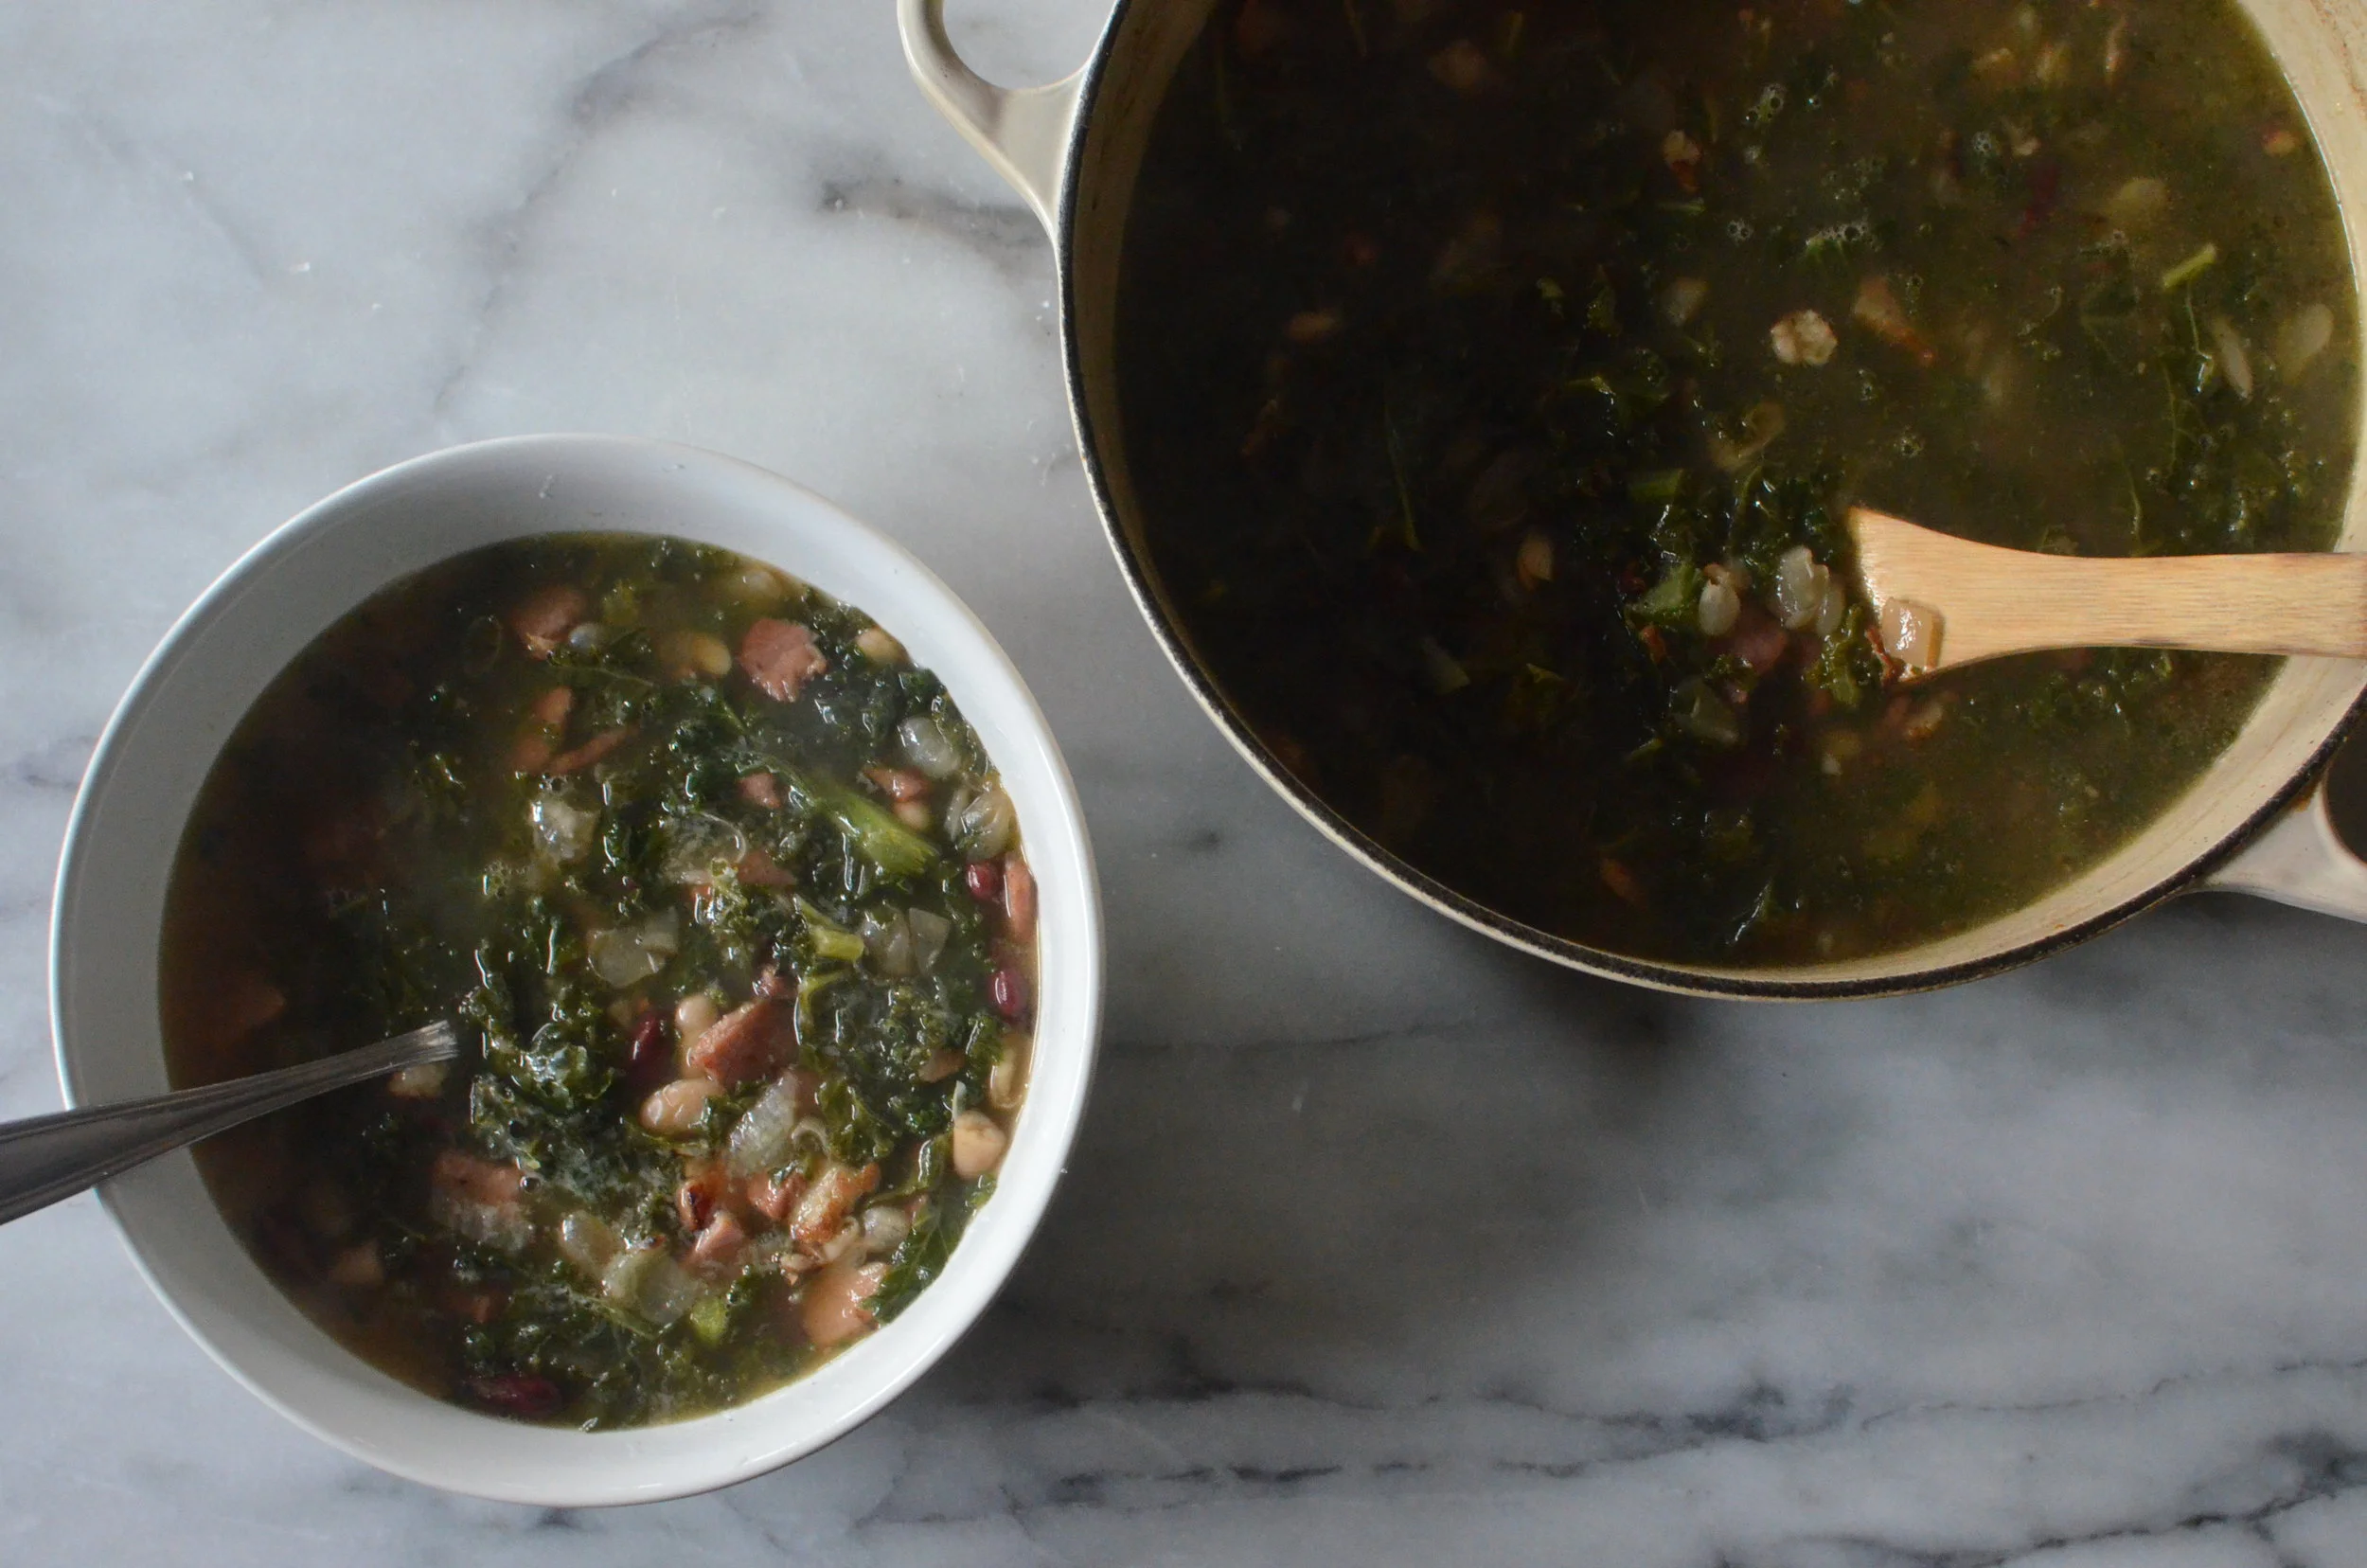
sick day soup
When I'm feeling sick, whether from a cold, the flu, or even just a few too many glasses of wine (we've all been there, don't judge) I always crave soup.
Since I'm not a huge chicken noodle soup kinda guy, I always experiment! This week I woke up Monday morning with the worst cold I've had in awhile. I think the fluctuation in weather really took a toll on my immune system, and I could NOT get out of bed. A few hours later, the soup craving kicked in. I know I'm on the upswing when I start to feel hungry again so I moseyed into the kitchen and took to the stove Chopped style. I found white beans, red beans, kale, pancetta, and chicken stock (I always keep my kitchen stocked with it!).
- 1 cup pancetta, diced
- 1 yellow onion, diced
- 2 cups chopped kale
- 1 garlic clove, minced
- 1 teaspoon cayenne pepper
- 2 cans drained white (or Cannellini) beans
- 1 can drained Kidney beans
- 1 chunk of good parmigiano-reggiano cheese
- 6 cups chicken stock
In a large stock pot, add the onion, garlic, and pancetta to 2 tablespoons of hot olive oil, stirring occasionally until most of the fat renders from the pancetta.
When you notice that the fond (caramelized bits of pancetta stuck to the bottom of the pot) isstarting to brown, add the beans and kale and cayenne pepper. Stir! Once the kale and beans are evenly coated, add the chicken stock.

Cover and let simmer on medium heat for about 30-45 minutes, depending on how tender you like the kale. Once the soup is ready, and the fragrance fills your kitchen, serve and top with freshly grated parmigiano-reggiano. So simple, so easy and SO delicious.
With-in minutes of having the soup, maybe due to the act of making it (or the DayQuil) I was feeling better. Perfect for this in-between winter and spring weather we're having, and so filling. What's your favorite cold remedy?

snacking with spice
Hey y'all! Just a short and simple snack post this week, as I gear up for my big Sauté + Rosé Takes New York post!
Have you ever been hungry and not known what you want? You just stare at the fridge, knowing that you want something to munch on but haven't the slightest idea of what you're craving. I wanted something healthy, instead of going for the barbecue chips or Hot Cheetos. Maybe something sweet, maybe a little spicy and definitely crunchy. I'm working from home this week, and that ritual of me in front of the fridge and then pantry and back to the fridge happens all to often. I started looking around to see what I could snack on and found some cashews. PERFECT! They're heart healthy (heart disease runs in my family on both sides) and they've been shown to lower blood pressure! I started snacking away but they quickly lost their luster and I though, DUH, just add some spices! That's exactly what I did.
Here's what you need:
- 1 cup unsalted roasted cashews (or your favorite nut)
- 1 tablespoon coconut oil
- 1 tablespoon cayenne pepper
- 1/2 tablespoon onion powder
- 1/2 tablespoon garlic salt
- 1 tablespoon fresh orange zest
Start by heated the oil in a small sauté pan, and just when it's melted completely add the nuts! Toss until the nuts are coated with the oil and immediately add the cayenne pepper, onion powder, and garlic salt. Toss for about a minute, until the spices are fragrant and fill the kitchen. Remove from the heat and add to a serving bowl.

Zest the orange over the nuts and enjoy! I love them warm, but cooled they're perfect for travel. Every time I make these I plan on taking them to the office, but they never leave the kitchen!

healthy harvesting
I work full-time and I often forget to make a lunch to take to the office (or just don't because sleep is more important, duh) and since I work close to so many great restaurants I have so much to choose from! If I'm feeling like ramen, I'll get it! Want a steak? There's a steakhouse! One of my favorite places is sweetgreen.
I first learned about sweetgreen while I was working for SoulCycle. Since most of the management staff came from NYC, they were so excited when it opened here in Chicago. It's first week open I think we all ordered it for lunch 3 times in a row. It helped that it wasn't too far! When I changed careers, I was so happy when I realized that my office is even closer than SoulCycle was!
It's basically a high end chipotle but for salads and there are so many different combinations you can create OR you can order from the menu! My go-to, especially in the fall and winter is the Harvest Bowl. It has organic wild rice, shredded kale, apples, sweet potatoes (I used butternut squash), roasted chicken, goat cheese, toasted almonds, and balsamic vinaigrette. It's healthy, filling and delicious. Most of the time, I can't finish the entire thing! So I save the rest for that 3PM slump.
This is so fun to make, and honestly so easy if you get the timing right. If you're worried about timing, just make each component once at a time! Here's what you need:

- 1 cup wild rice
- 4 cups mushroom broth
- 1 medium butternut squash
- 1 large gala apple
- 1 bunch of dinosaur kale
- 1 small yellow onion
- 1 log of goat cheese
- 2 grilled chicken breast
- balsamic vinegar
- olive oil
- salt + pepper
- garlic salt
- cayenne pepper
- toasted almonds (or any roasted nuts)
I start with the rice! After rinsing one cup in cool water, I add it to a medium sauce pan with 4 cups of mushroom broth and salt. Bring it to a boil, lower it to a simmer and DON'T STIR! Just let it sit over low heat until the broth cooks off. About 25-30 minutes. Wild rice cracks open when it's done, so just keep an eye on it! Once it's done, taste and season as needed! The mushroom broth gives the rice a really nice umami flavor. I keep mushroom, chicken, veggie, and beef broth stocked in my pantry for different soups and sauces. If you don't have broth, no worries, just use water.
While the rice is cooking it's time to get the squash going! Pre-heat the oven to roast at 350˚. Then, break down the butternut squash: peeling, coring, and cutting into bite sized pieces. My happy spot is about 1/4 inch cubes. Drizzle with olive oil, season with salt&pepper, and sprinkle with some cayenne pepper! That should take about 10 minutes. Just pop the squash in the oven and let it roast until the rice is done! SO easy!
Next, the apples. Start by dicing the yellow onion and setting it aside. Then, do the same with the apple! If you have an apple corer, it make this SO easy! I try to cut the apple into the same bite-size pieces as the squash. Add to a medium pan with some olive oil and sauté for about 5 minutes, just until the apples are tender but not mushy. Season to taste with s&p.
The next part is seriously the easiest. Take the kale and rip it. That's right! Rip. With your hands! It's the easiest way to get the kale into bite sized pieces. Then just toss it with a drizzle of balsamic vinegar and olive oil! Add s&p to taste.
Lastly, you could make your own chicken breast, but why? Every time I go to the grocery store, a rotisserie chicken is always on my list. They're cheap and so easy to break down and use in so many recipes -- you can even get them already broken down so you don't have to worry about deboning it! Just chop the chicken breasts into cubes and you're set.
That's it! Combine all of the components into a bowl and add some goat cheese right in the center. It'll start to melt from the warmth of the squash, apples, and rice and start to mix with the balsamic and olive oil. I like to mix my bowl so each bite has a bit of everything. SO delicious. The salad/bowl wouldn't be a true sweetgreen replica without a slice (or loaf) of bread on the side. What's great about this salad is that you can eat it warm or cold! I love it both ways. I love making this in doubles (just double everything you need) and it's perfect for a group! Everyone can add what they love and leave out what they don't. Just pair it with a Sauvignon Blanc. It pairs so well with the goat cheese.
Enjoy!

comfort pasta
There are definitely more than a few foods I consider comfort foods, especially when food is my comfort. Pasta always seems to be right at the top of my list, though! Something about the way it cradles the right sauce, pairs well with wine, and is even better the next day make it one of my top comfort foods. Boxed pasta is definitely the easiest but if you have about an hour to spare (and some aggression to let out) fresh pasta is the way to go!
I recently received the pasta rolling attachment for my KitchenAide stand mixer and since, have become a pasta making machine. It’s SO easy!
Here’s what you need:
- 4 cups all purpose flour
- 4 large eggs
- salt & pepper to taste
That’s it. Seriously.
The dough:
- Mound 4 cups of all purpose flour on a cutting board (I use a marble slab so it stays cool) and create a well in the center
- Crack four eggs into the well and add freshly ground pepper and a pinch of salt
- Slowly beat the eggs with a fork adding flour from the sides until a soft dough forms
- Once the dough forms, clear the board of he excess flour and continue to knead for about 10 minutes
- Cover with plastic wrap and rest for 30 minutes
Linguine:
- After your dough has rested, cut in 4’s
- Cover the remaining 3
- Using a rolling pin (or pasta attachment) roll the dough out until you just translucent enough to see your fingers underneath
- (If using an attachment, switch to your favorite pasta cutter)
- Once your dough is thin, using a sharp knife, fold into 3’s length wise and cut into thin strips
- Repeat with remaining 3 sections of dough


You can totally get away with shortcuts here, boxed pasta, jarred sauce etc. For me, the effort of rolling out the dough, the focus that the meatballs require and the patience that sauce needs all take my mind off of whatever I'm stressed about. Maybe the one (or two or three...) glasses of Pinot Noir help, but who knows?

Once you’ve mastered the dough making process, the possibilities are endless! There are over a thousand different styles of pasta, each unique because of the way it holds the sauce. My ultimate comfort pasta dish is definitely spaghetti and meatballs.
Here’s what you need for the sauce:
- 3 tablespoons of tomato paste
- 2 8oz cans of tomato sauce
- 6 medium tomatoes
- 4 cloves of garlic
- 1 tablespoon of oregano
- 1 tablespoon of basil
- 1 teaspoon of cayenne pepper (or more if you like spice)
- Salt & pepper to taste
- 1 small onion
- A bottle of Pinot Noir
- Parmigiano-Reggiano
I start by finely chopping the onion and garlic, and setting them aside #misenplace. Setting my oven to roast at 375°, I quarter the tomatoes and sprinkle with sea salt and freshly cracked pepper and toss them in olive oil. Once the oven is ready I pop them in on a foil lined baking sheet for about 15-25 minutes or just until they’re tender and slightly charred on the edges. No need to remove the seeds! They’ll thicken the sauce. In a large sauce pan (I use a Dutch oven) add a tablespoon of olive oil and when hot add the remaining garlic and onions, just until they’re translucent and smell sweet. Add the roasted tomato and tomato paste and let the juices from the tomato cook down! There should be a nice layer of frond on the bottom of the pan, from the onions and evaporated tomato juices after about 5 minutes. Quickly deglaze the pot with 1/2 cup of Pinot Noir. Once the tomatoes have deepened in color, add the can of tomato sauce and blend with an immersion blender until the tomatoes are in small chunks. If you don’t have an immersion blender, a wooden spoon will do just fine! Just smash the tomatoes against the side of the pot until you’ve found the perfect consistency. Then, let the sauce simmer for at least 45 minutes adding parm to taste. The longer the sauce simmers, the more developed the flavors become!
When I’m feeling extra moody, which is often since I’m 100% a cancer, nothing makes this dish better than meatballs. Here’s what you’ll need:
- 1 pound of ground beef
- 1/2 pound of Italian sausage (I use spicy)
- 1/2 cup breadcrumbs
- 2 eggs
- 1/2 tablespoon of mustard
- Teaspoon of red pepper flakes
- 1/2 cup of freshly grated Parmigiano-Reggiano
In a large mixing bowl add all ingredient and mix using your hands just until everything is evenly incorporated. Using a tablespoon, scoop out enough of the meat mixture to form balls about the size of ping pong ball. Once all the meat is formed into balls, cover and let chill in the refrigerator for 15 minutes.
In a sauté pan, heat a tablespoon of olive oil over high heat. Add the meatballs one by one as sear until deep brown on all sizes, but not fully cooked. Add to the hot tomato sauce, cover and let simmer until fully cooked.

Smoothies are healthy, right?
As someone who likes to pretend they're healthier than they actually are (sorry, I can't commit to meal prepping-- I love bacon too much) I LOVE smoothies. There are so many ways to change them up with random fruits you have laying around your kitchen (or frozen fruits in your freezer). Since I work full-time, I try to get to the gym early (and I mean EARLY) but that definitely doesn't always happen. I mean, is there a better feeling than hitting then telling Alexa to turn your alarm off...more than once? So I don't feel like total garbage person for not making it to the gym, I try to have a healthy smoothie for breakfast. . There's something to be said about drinking something good for you out of a gold straw. Obviously it helps if you have a gold straw so don't worry, I've linked them here. I have a few go to smoothies, but they all start with the coconut almond milk blend by Silk!

Here's what you need:
Banana Mocha Smoothie
- 1 cup Unsweetened Almond Coconut Blend
- 1/2 cup cold brew (I used Trader Joe's cold brew concentrate)
- 2 tbsp of almond butter (crunchy is my favorite)
- 1 frozen banana
- 1/4 cup of blueberries (I use frozen so I don't have to add ice)
- 1 tbsp of chia seeds
- 1 scoop of chocolate protein powder (I love Vega Plant Protein -- so good)
Berry Smoothie
- 1 cup Unsweetened Almond Coconut Blend
- 1/4 cup frozen blueberries
- 1/4 cup frozen strawberries
- handful of baby spinach
- 2 tbsp almond butter
- 1 tbsp chia seeds
- 1 scoop of vanilla protein powder (again, I LOVE the Vega Plant Protein)
One of my favorite ways to enjoy the berry smoothie, especially on the weekends, is in a smoothie bowl! To make it a bit thicker (and who doesn't like them a little thiccer) I use a 1/4 cup less Unsweeted Almond Coconut Blend and an extra tablespoon of almond butter. I top it with sliced strawberries, toasted coconut, almonds, and an extra sprinkling of chia seeds!
These are just a few of the smoothies I make! Sometimes I add pineapple, sometimes it's mango! Just depends on the fruits I have around (yes, even frozen). The possibilities are endless and while they all very in flavor, they're all best if enjoyed in a stemmed glass through a gold straw! If it's after 5pm, then it's a whole different kind of smoothie I'm drinking. What are your favorite smoothie combinations?


the beginning

I remember the sounds and smells of the kitchen; the scent of the onions as they transformed from stark white and bitter to deep caramel and sweet. The laughter coming from my mom, aunt, and grandmother, switching so quickly from English to Spanish and back to English. My dad and uncle watching football on the couch and me, just sitting at the table, soaking it all in. Listening to those conversations, I learned some of life's most valuable lessons: never touch your eyes after cutting jalapeños, always cut meat and veggies with a different knife, and always cook with love.
Years later, living on my own I was drawn to competition cooking shows. At first I didn't realize that the controlled chaos of the kitchen reminded me of my childhood, I just knew that I loved it. While I couldn't smell what they were cooking, I knew I had to. I followed along, wrote everything down, and tried recipes on my own. Slowly but surely I began to navigate my way around the kitchen. Entertaining with food became my happy place! The smells of the kitchen, the sounds of my friends laughing as they watched, I found my passion. My newly found passion for the kitchen wasn't really new at all! It was being fueled by the memories of my family.
Sauté + Rosé is the culmination of my love affair with cooking. Using family recipes, some developed on my own, and restaurant recreations, follow along! There will never be too many cooks in my kitchen! The entrance fee is a bottle of rosé.